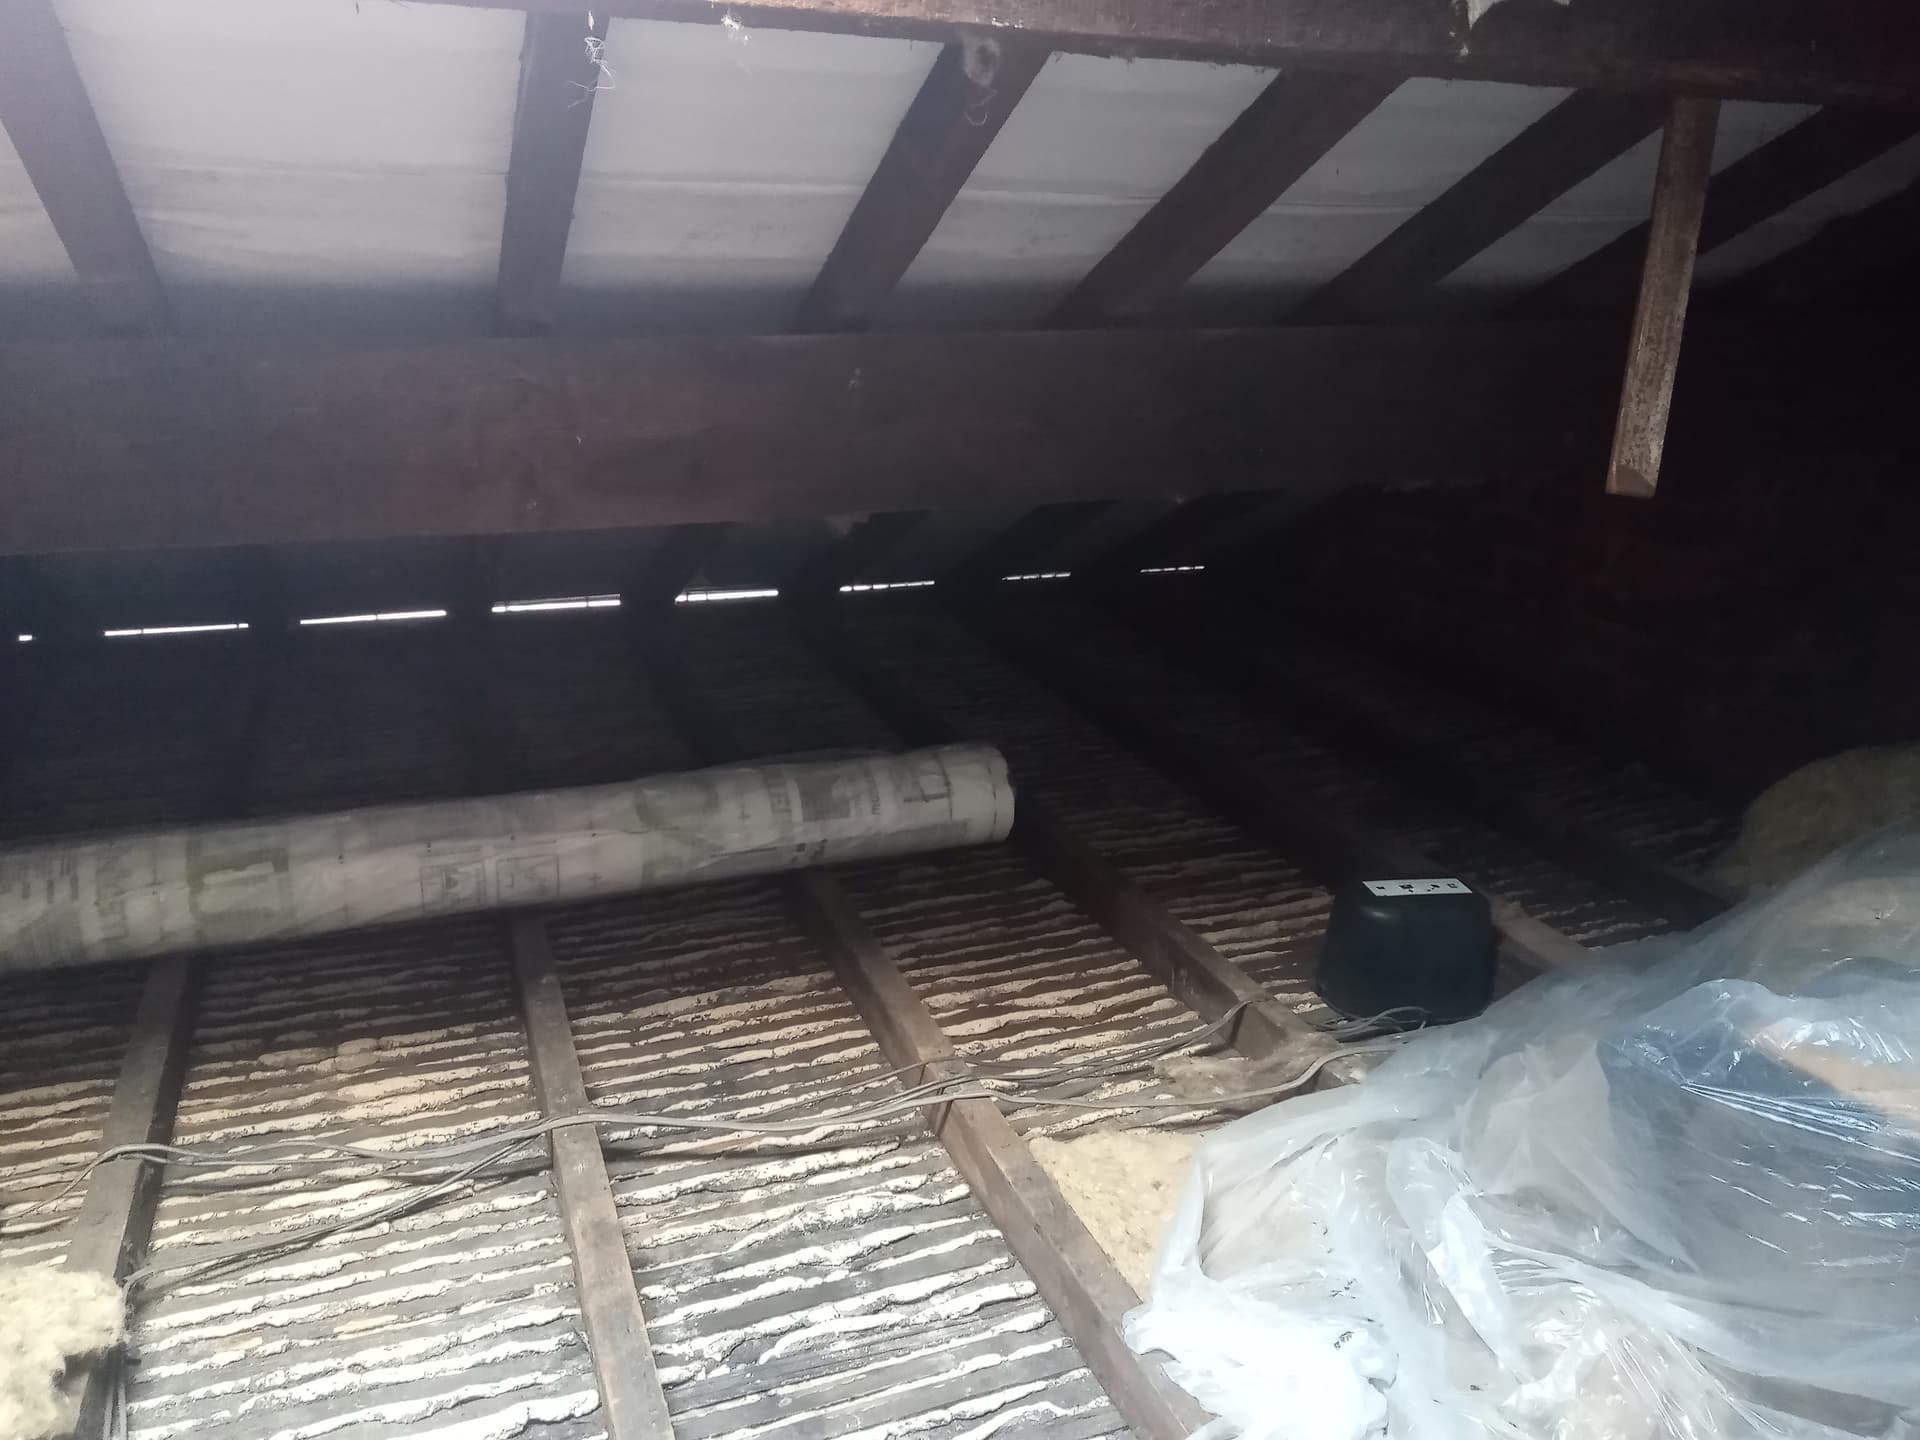
Our (cold) loft had moisture problems - through multiple causes.
a non-breathable plastic roof liner
a prior poor renovation of the loft space for a make-shift office had blocked ventilation at the eaves
-stack effect from pipes in a stud wall open at the top in the loft was billowing in hot air in the winter
-poor U values of plaster board ceilings in the rooms below were enabling the passage of warm air into the cold loft (another example of stack effect).
more uninsulated hot water pipes in the exterior walls in the bathroom below are heating the solid brick walls and enabling more heat from the house below into the loft.
a poorly insulated loft hatch
multiple openings in the plaster for electrical wiring coming up into the loft through the floor - another source of stack effect.
PPR put a detail together for us, with recommendations of what to do and what materials to use.
We’ve been completing part of the work on the loft floor ourselves.
It’s massive learning curve and considering the difficulties of working in a loft space, it’s been challenging and because of this I’m keen to share our experience here to help others, because it’s not just been a simple case of insulating a loft.
There are a few crucial checks which should be made in a loft before attempting to lay insulation. Had we under stood this, we wouldn’t have ‘just laid new insulation’ to have to take it up again and see it spoil with further work.
Here is what we learned we should have checked and understood for a cold loft space.
Check your loft in winter - this is when problems appear - when the heating goes on and it’s cold outside. This when you will see if moisture is present.
Ventilation - does the loft have adequate ventilation.
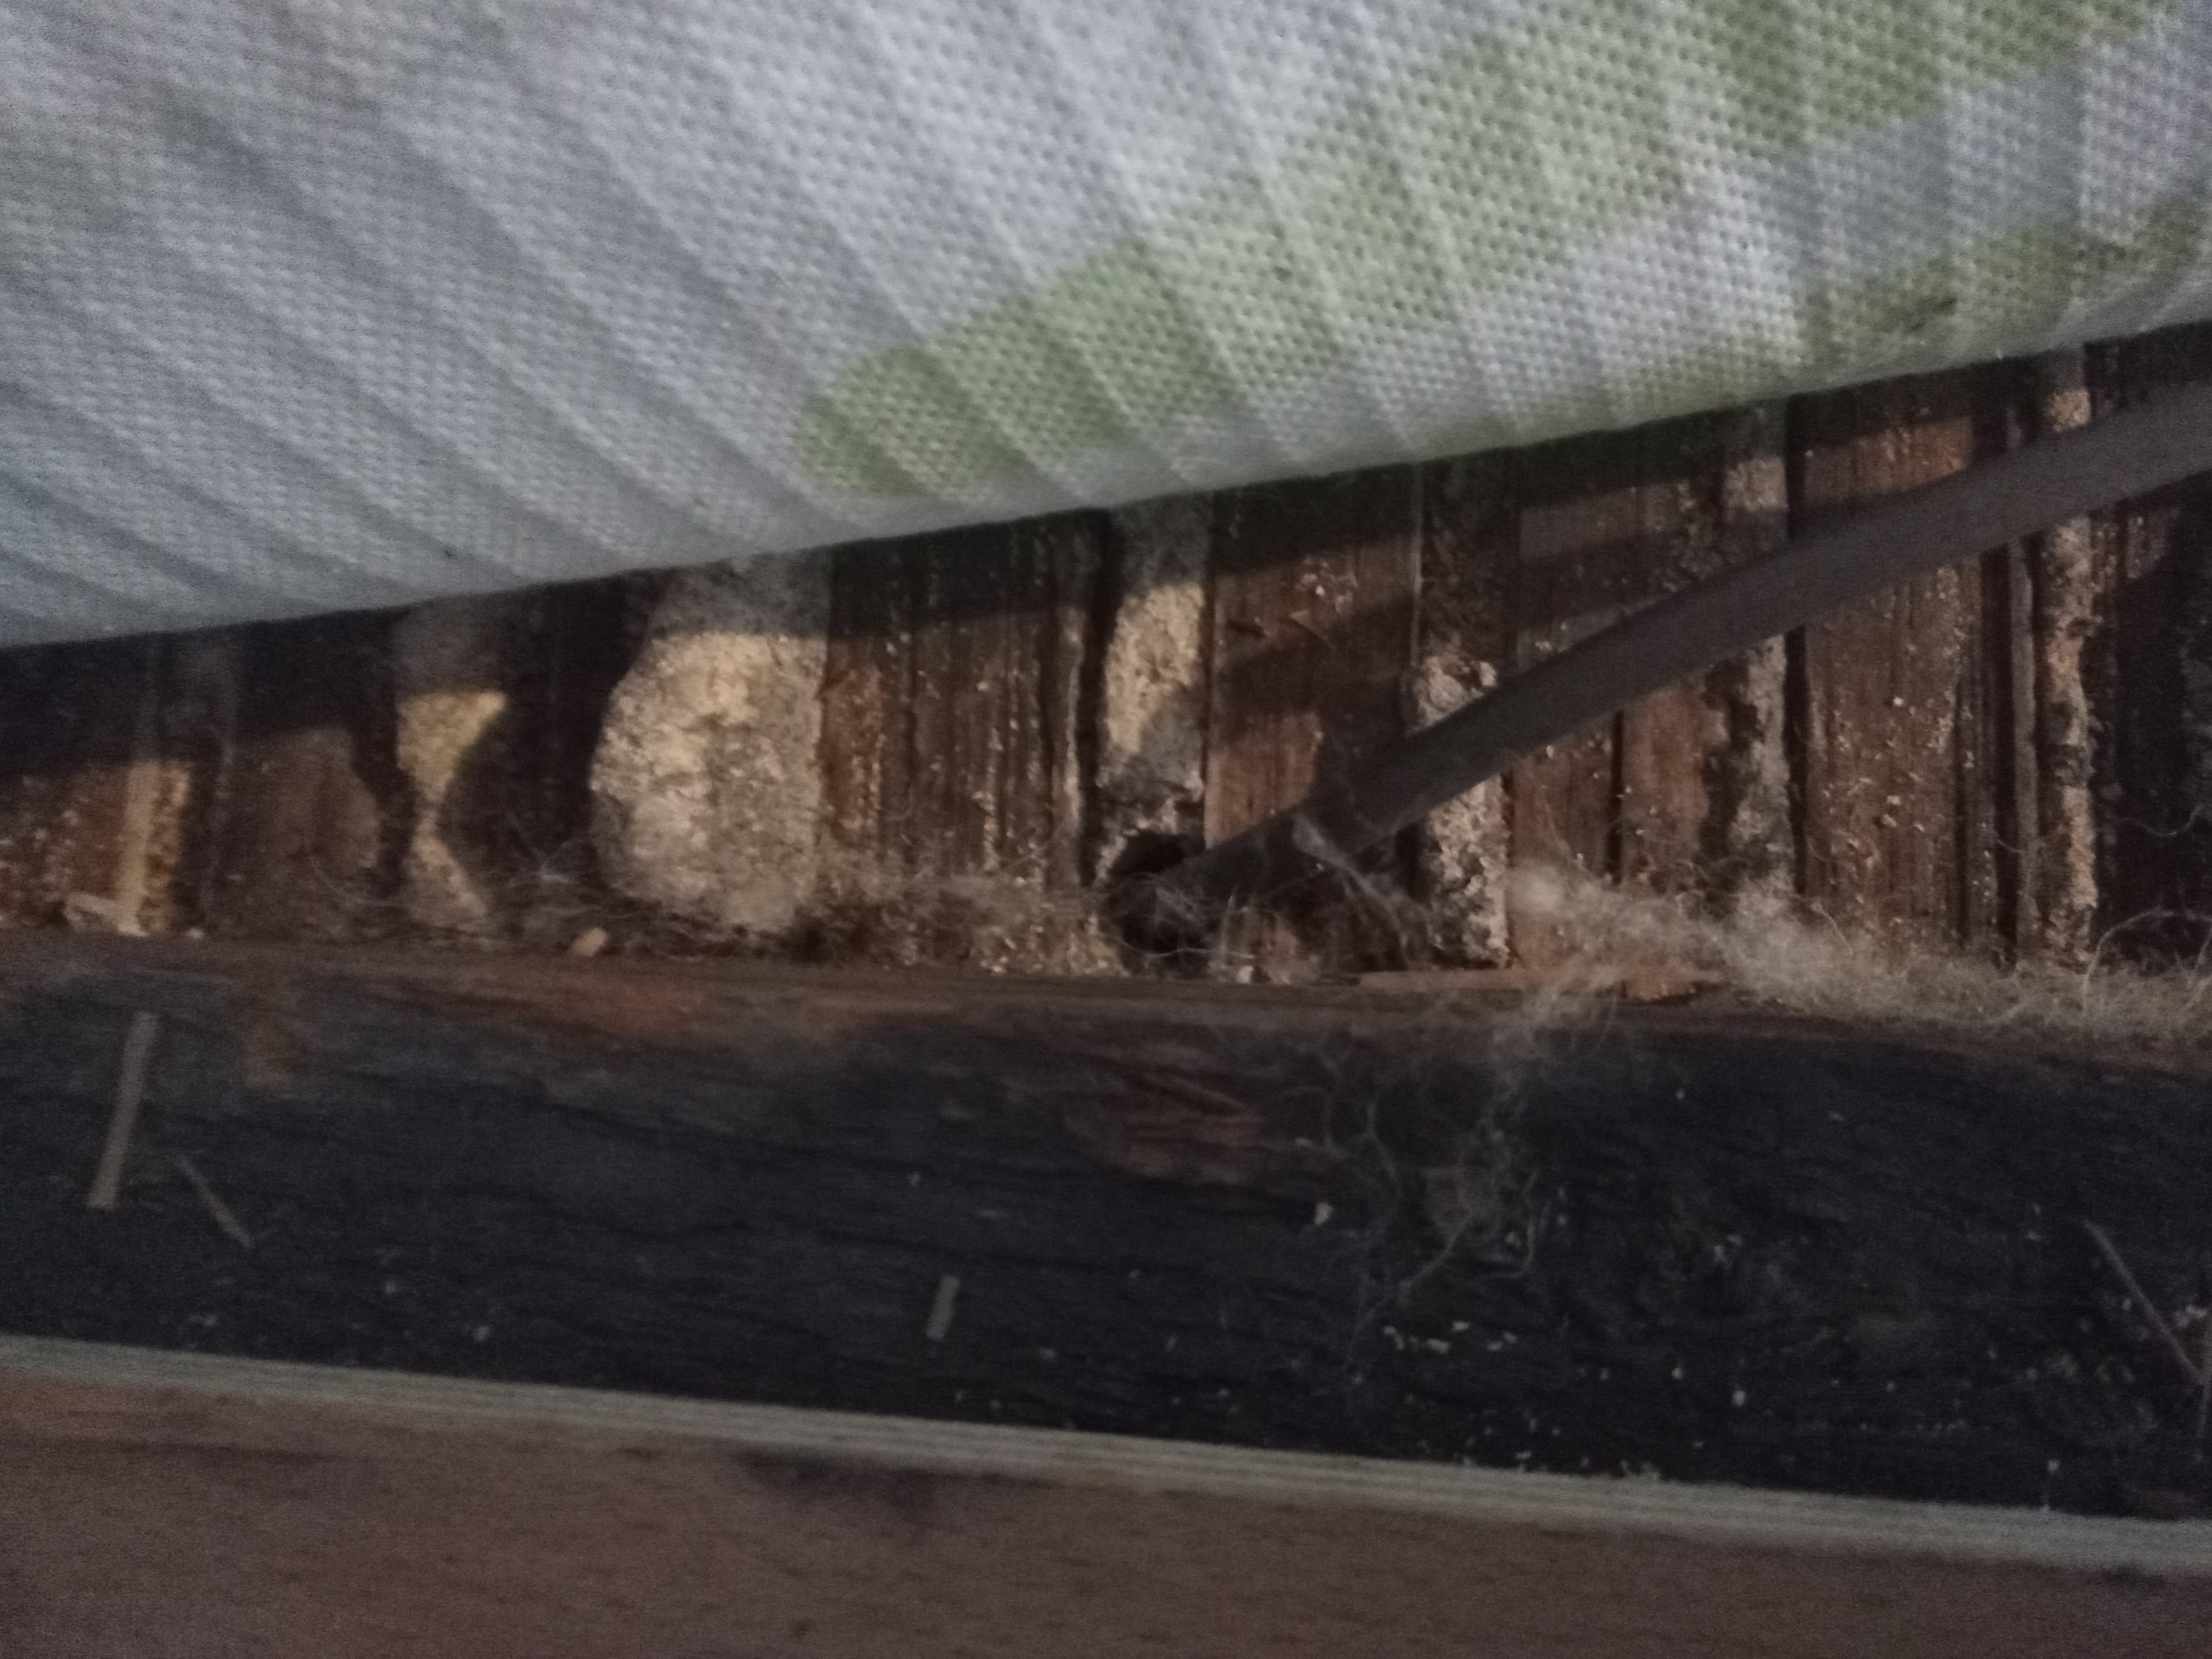
Moisture - if you’ve got condensation in a cold loft you’ve got a hot air leaking in from the house below - this needs fixing before you lay insulation.
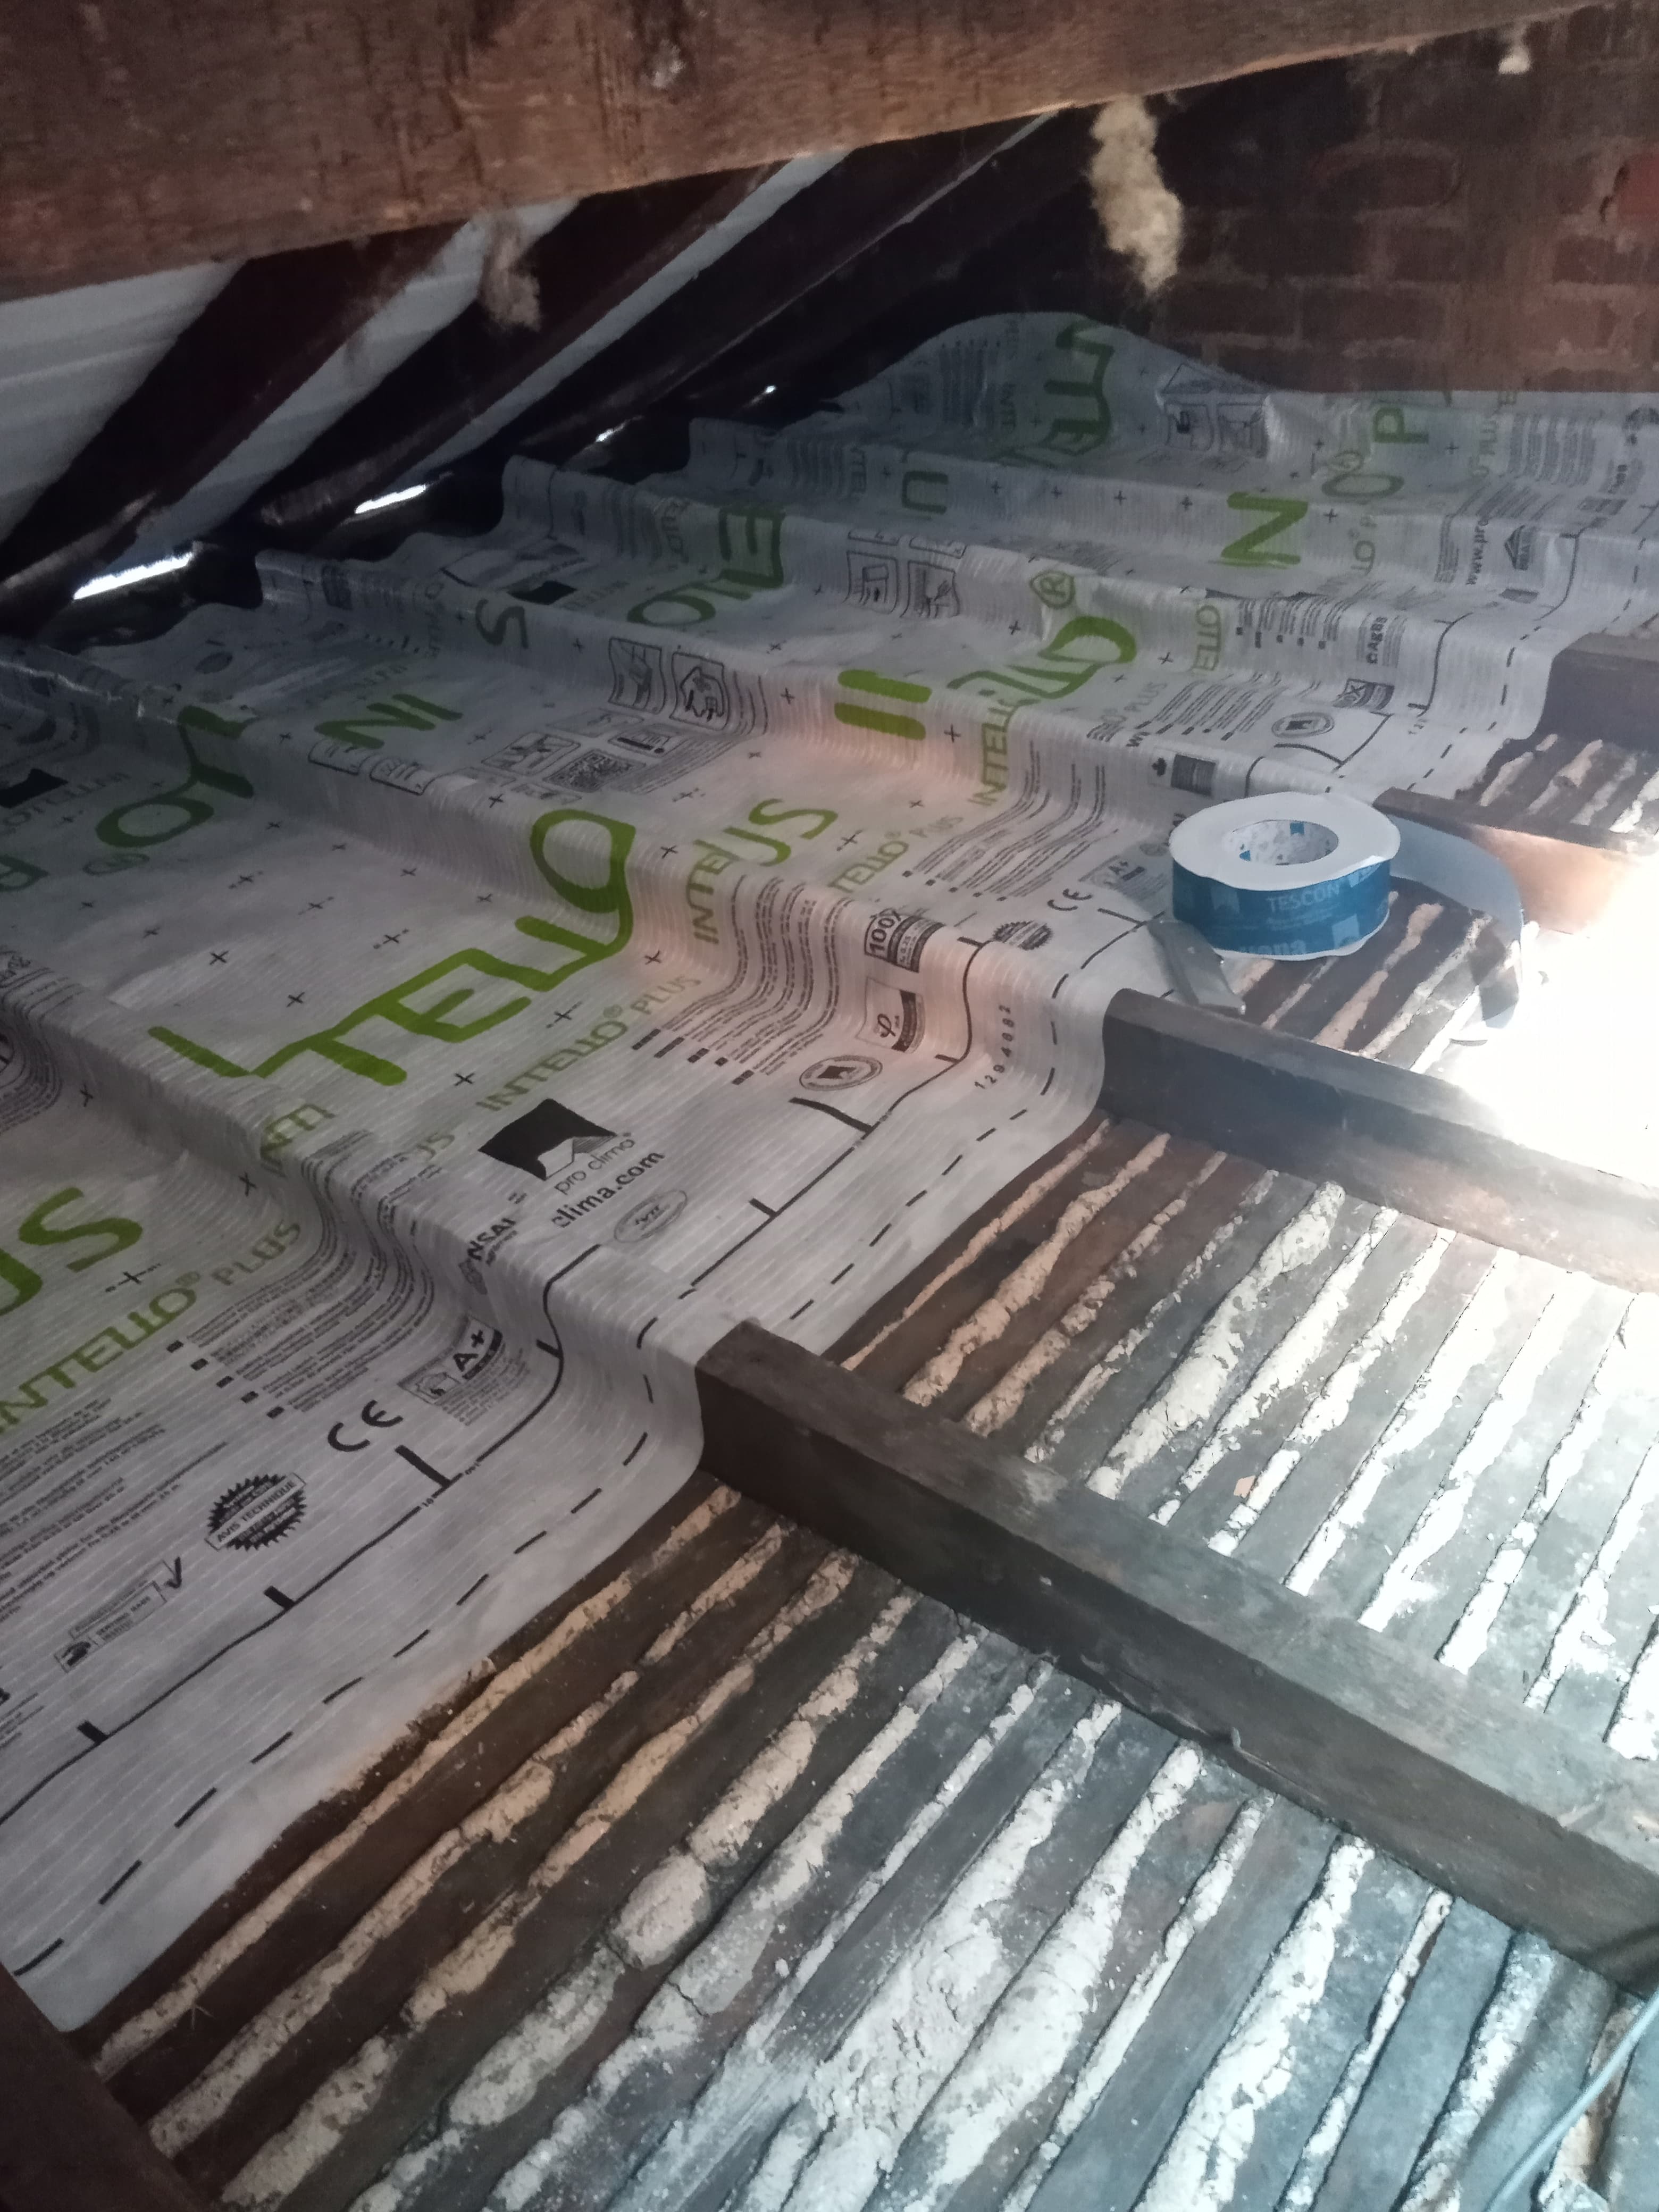
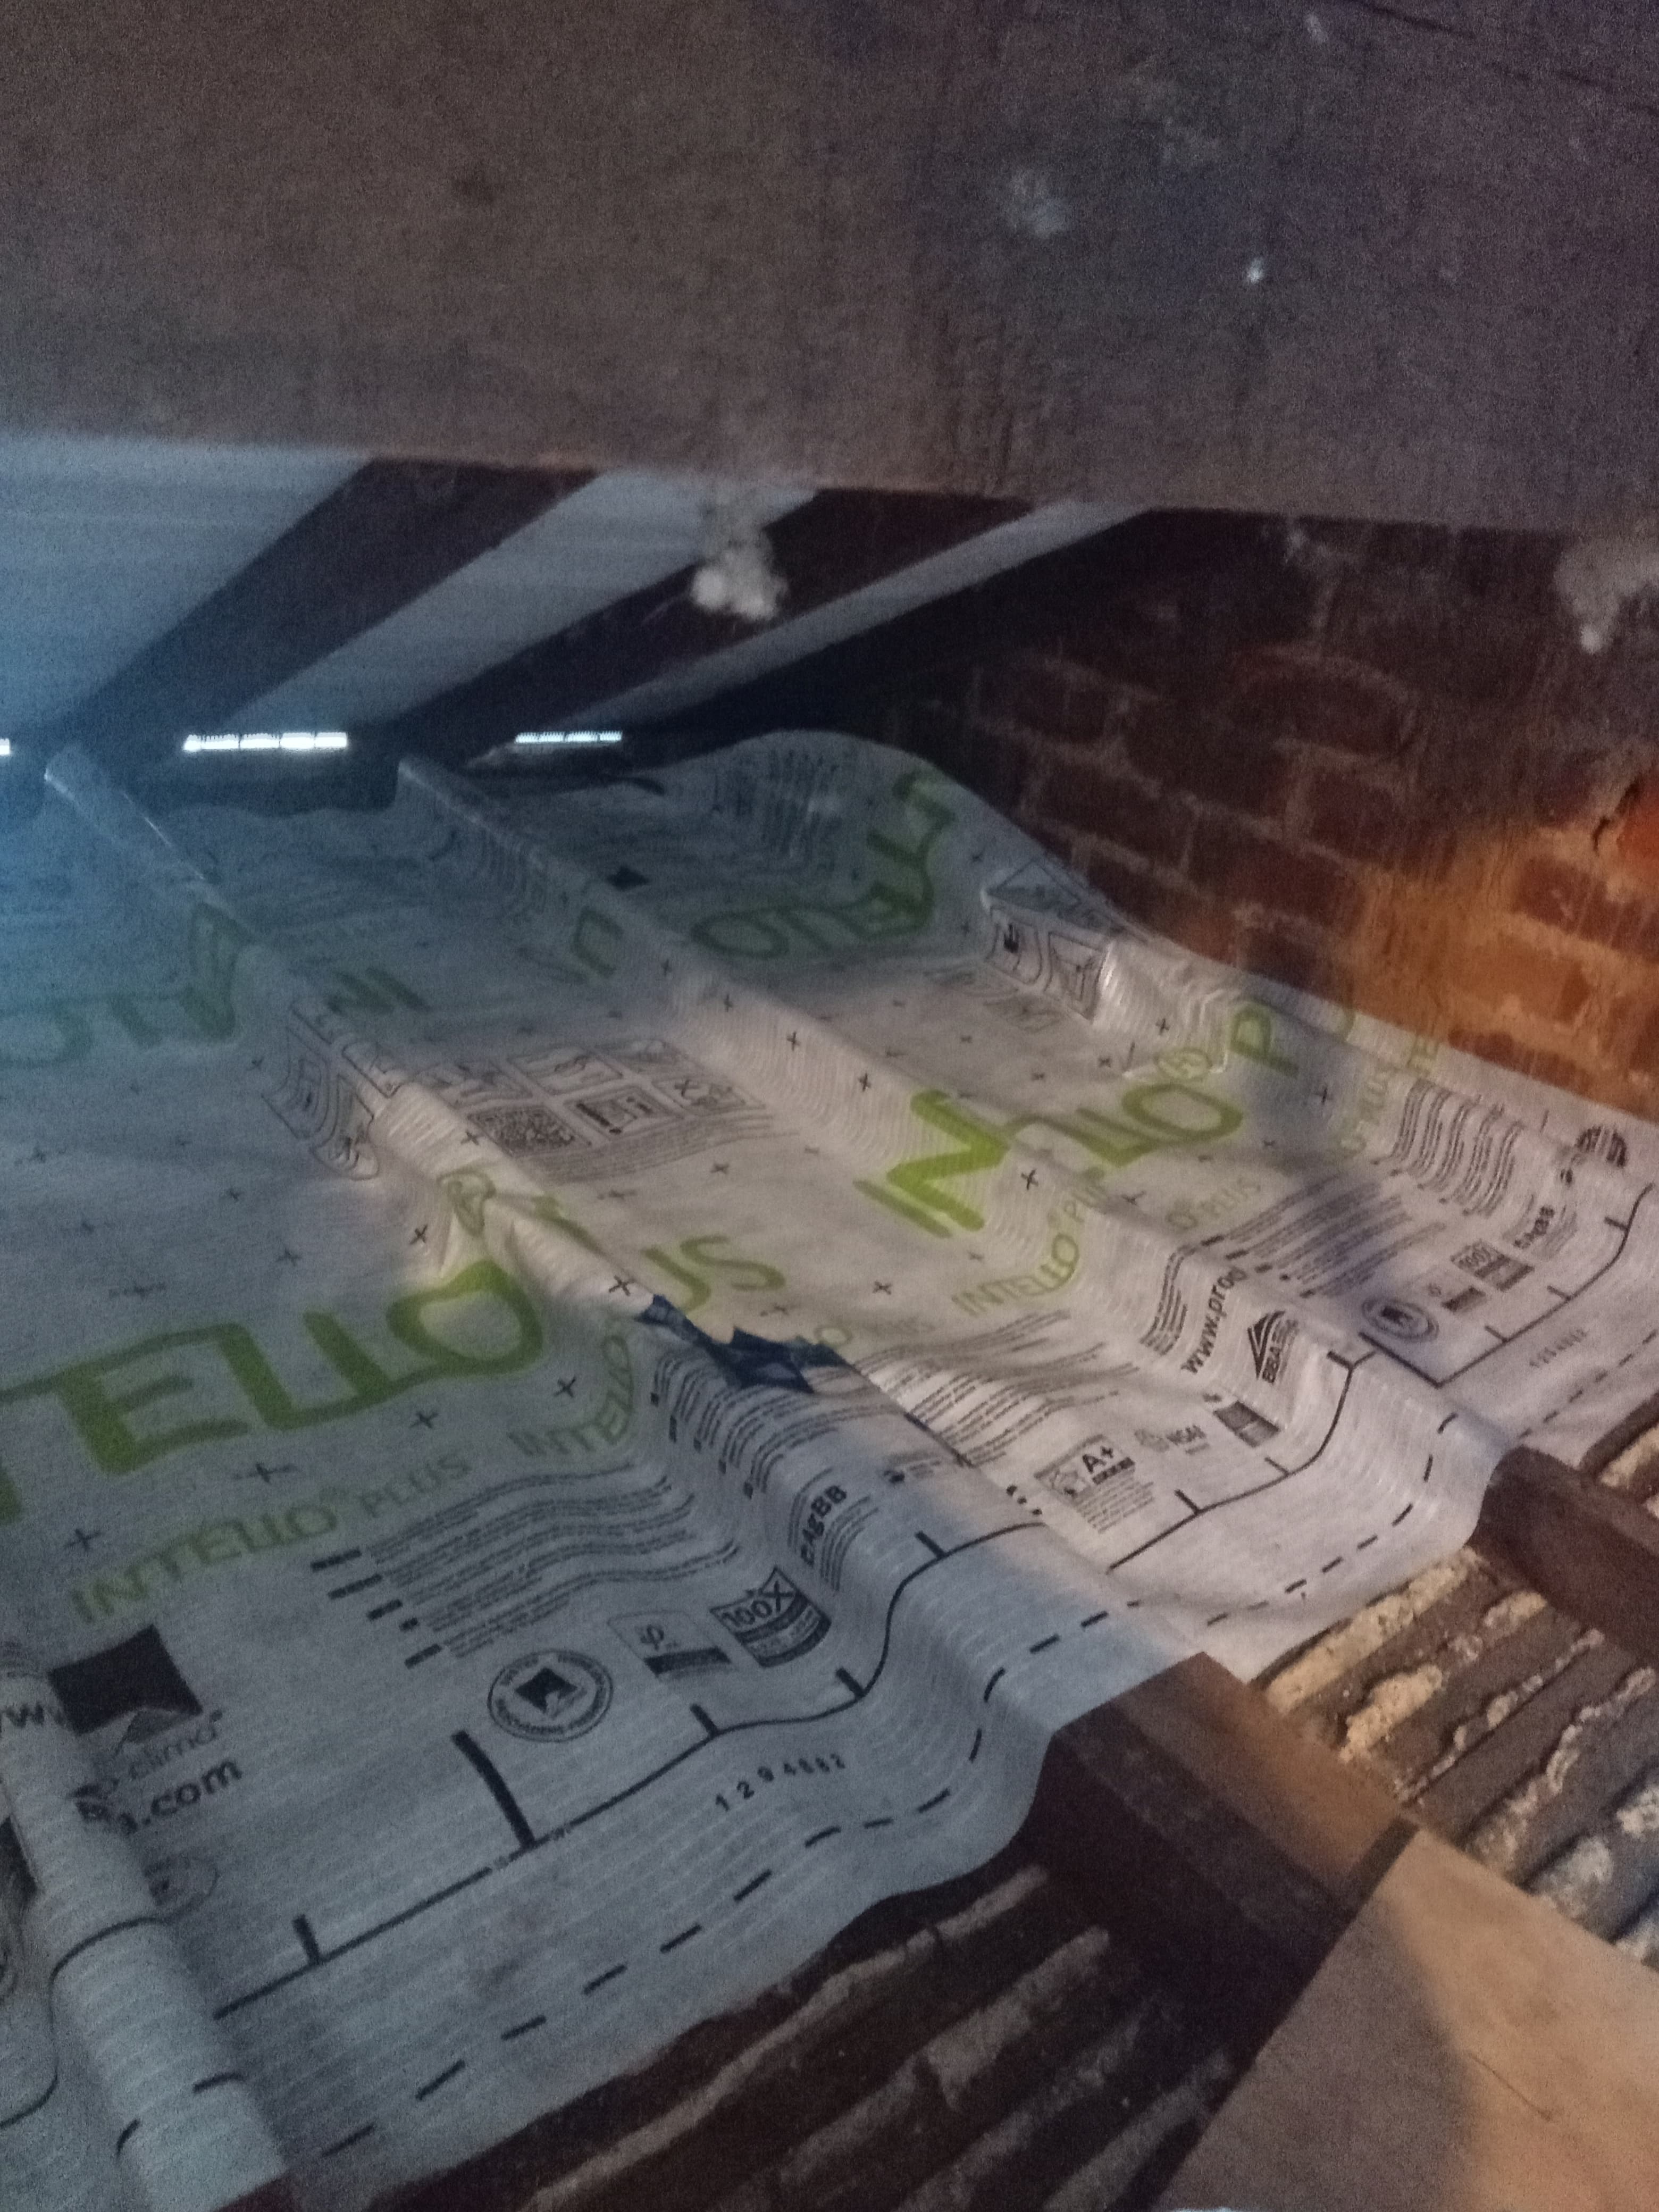
We can’t replace our ceilings for plaster board with better u- values so using a vapour control liner and sealing any other air passages has been our course of action.
Currently we’re laying the Intello vapour control layer on the loft floor.
We had to remove our insulation to do this.
We also watched a couple of YouTube videos to help us…
Well, I can tell you it’s not easy slithering about on your belly trying not to fall through the loft floor, or slice yourself with the Stanley blade while you try to cut airtight tape which wants to stick anywhere except where you want it!
Thankfully, we have got into a stride with it and accepted that Victorian houses are far from symmetrical - giving us additional challenges. Basically we’re being patiently persistent and pacing ourselves by doing a bit at a time.
Here is what we achieved so far.
A couple of snags we hit were where we had to cut the liner to work around wires.
We’d already spent so much money on sheep wool insulation , that we’ve wanted to ensure we save it from further damage after the moisture problems.
The additional investment of a premium liner was part of this.
Our whole journey in our roof space has been backwards!!
We had the roof felt replaced too.
It’s been very costly!
Fortunately though, we did get solar through the grant scheme while we had the roof redone !
So not all bad with the roof!!
However ’ the ultra modern’ wetroom fitted by the previous owners is a great source of problems.
Wait for my post about that!!
For those using this thread for guidance and inspiration there are other ways to approach the problem but the key fact is that the vapour barrier has to be on the warm side of the insulation, where the vapour is vapour and not condensation.
A nephew super insulated his loft before discovering that there were plumes of vapour rising into his insulation. Actually what he discovered was wet insulation. In his case the rooms below were bare and about to be refitted so I suggested fixing foil faced plaster board to the ceilings with joins taped before skimming. Foil faced plaster board is both air and vapour proof and helps achieve better airtightness.
In a ventilated roof you don’t need any vapour barrier or retarder as the roof ventilation is more than enough to deal with any vapor from inside the building - on the odd occasion it’s high enough.
You do need it to be air tight though, as draughts, especially from bathrooms, move much more water.
Any vapour open, air tight membrane system will do. The general rule of thumb is to use open assemblies where possible. This will save a lot of money and is better practice.
It’s true to say that we may have gone overboard with our roof measures, especially as we have had the roof tiles removed and relaid to change the plastic liner for a breathable one and we had vents installed near the apex too.
Prior to this we’d already had the design detail and bought the vapour control layer and tapes - so we’ve still installed.
However, one of these larger measures alone may have solved the moisture problem.
The biggest lesson here is in how we layer in retrofit - we have already learned the hard way how an effective fabric first approach is to make sure surfaces you’re layering onto are sound and free from other problems.
You wouldn’t put solar on a roof with any underlying problems
This is one of the lessons we’re seeing in our wetroom.
In addition to this lesson is a big lesson in practicality and unnecessary layers being ripped out and wasted to gain access to problems that were also hidden and festering away.
As the AECB puts it, past “improvements” may be anything but.
A classic example is rendering a damp wall to keep the rain out and thus trapping humidity in the house to cause further damage.
Personally I think that landlords have a lot to answer for. For the sake of a cheap quick fix untold damage is done to the housing stock. Before landlords are licensed to let property they should attend a compulsory building fabric course.
Edit: not all areas of the country run landlord licensing schemes, yet.
Hi polly,
Your loft has the same layout as mine (not with the lath and plaster) and mine may be higher and what i have done is to double up the ceiling beams ( they were 3 x2s) and put a steel plate(3 x 70mm) in the middle to make a flinch beam and then flooring on top. I did insulate in between. And it has made a very strong floor and no increase in hight.
John
If we doubled up the height of the loft floor, I’d be concerned that we might lose ventilation at the eaves.
I have thought about building it up on the middle though - for storage.
I did fit some loft zone floor there, but that has to come up when we lay the vapour layer.
Having to undo previous work to make good has been very frustrating. I don’t enjoy being in the loft.
I can honestly say I wouldn’t have stayed the distance with this if we’d fitted rock wool. At least with the sheep wool I can handle it with my bare hands without skin irritation.
My plan was to bring the loft into use and insulate at the roof line (and venerate the eaves,and all areas controled by hrvs), will have to send photos
John
Yes its hard having to back track.
As an after thought from the whole journey with the loft - I had wondered if insulating the roof and making the loft warm might have been a better option.
However, having insulation in the rafters would have caused problems for the solar install.
I have a warm roof and 2 solar arrays. Fitting the arrays was no more difficult but it was up to me to make airtight after the teams had gone. The fitters basically push a big needle through the insulation and spray a token amount of foam into the hole afterwards. If I’d lined the insulation boards with anything it would have been more difficult.
Cold loft climate update
I’m so pleased to report, how after changing the non breathable roof felt and a vapour control layer under the loft insulation we now have a dry and airy roof space, despite the damp cold conditions outside.
It’s our belief, through changing the roof liner and adding ridge vents, this should have been enough to prevent the condensation we had dripping down the previous roof liner each winter.
However, the plaster board on the ceilings below has no foil back and is thin - warm air easily passes through and may cause moisture / mould on the underside of the sheepwool insulation we’d previously installed. To prevent this we decided to install the vapour barrier as well as the roof liner.
All in all, getting our roof dry and insulated has cost us in the region of £10,000.
The problems with the roof space were not picked up on the building survey owing to the loft being boarded out - the roof felt couldn’t be seen and we weren’t given any warnings from the surveyor.
Congratulations on completing the job. The bill is horrendous.
If your surveyor didn’t specify that the state of the roof could not be assessed you may still be able to make a small claim. The question for you is whether the risks and potential gains are worth the potential expense.
The bill is horrendous!!
Indeed it’s a typical ‘buyer beware’ situation. We knew the surveyor couldn’t gain access to the roof because he advised us to get access to check the remaining part of the chimney was supported. He didn’t mention checking the roof liner .
There are a couple of consolations - we knew the ridge tiles, chimney and slates needed attention and that we’d need to insulate - we just didn’t think we’d have to strip the roof , refelt and reslate. It’s been frustrating , but at least we managed to get solar through the grant scheme - it all feels like quite an achievement and a big learning curve!!
I would greatly value some thoughts on my plans for adding insulation and loft boards in my loft.
I have a detached house built around 1996.
Currently the loft has 190 mm joists about 700mm apart with about 100 mm of glass fibre insulation.
The plasterboard underneath is plastered and painted 2-3 with conventional vinyl paint on the living rooms side. Probably had about 3 layers of paint over time. The loft has very good vents and no condensation issues to date. Bathroom extractors are connected to tubes that are vented to the outside of the roof, exits near eves.
Plans: With the help of a builder, I am proposing to add 100 mm joists across the current joists, add in enough to create 270mm of insulation. Then we want to secure loft boards on top for storage of relatively light items. This would also give a 30 mm gap between the boards and the insulation. We are also adding in a loft ladder 1200mm by 700 mm and choosing an insulated version.
Questions: Should I include a vapour control/barrier on the plasterboard and on/around the current joists? Do I also need one under the loft boards that I planning to add on top. Some posts suggest it would be a good idea, others indicate that with a well-ventilated roof should not require the vapour control barrier installation. I also saw a link to a paint that would form a vapour control. May help avoid use of tapes to get at tricky joints and corners. Found this link via the AECB site. Vapour Control Paint | Intelligent Membranes.
Does the current painted ceiling plasterboard act as an air tight seal? I have a thermal camera booked - can it help me assess any key requirements?
I would greatly value our coop teams insights, questions and thoughts.
Topping up the insulation is a good idea and fixing the additional joists across the existing ones will both spread the weight over the existing timber and reduce your thermal bridges at joists to just the crossover points.
Vinyl paint, particularly several layers, will pretty well act as a vapour control, particularly if the original coat is primed direct to the plaster and not onto a lining paper. You will, however, need to attend to all penetrations. They will normally be where wires and pipes pass through the ceiling. Foam spray could be used, followed by Blowerproof or, as you suggest, Passive Purple. I only have experience of the former.
As you are boarding the insulated space that reduces the need for a top membrane to stop wind washing but do make sure that the ends are sealed to the roof plate to prevent air blowing under the boards. See
When you next decorate rooms below the loft you could top up the insulation and remove those final thermal bridges by fixing insulated plasterboard below the current ceiling. There will also be a marginal reduction in room volume, which will reduce the amount of air to be heated.