I started posting elsewhere and realised that my task is about to become a saga, so have started a new thread. I’ll copy the two posts I’ve already done into this thread and then link to here.
1 Like
The thermal camera has a narrower angle than the original photos but hopefully you can find your way around.
2 Likes
Well I still haven’t got the top board down but I did see that the plaster between board and ceiling was coming lose from my efforts. It was cracked previously, so no surprise. I ∴ decided that it would be less mess and danger to myself to remove the plaster myself rather than let it fall while I was below it. That would also enable my to see what was holding the board on place.
Oh dear, what a mess. Along the ceiling I see remnants of original plaster with sand and hair binding but the rest is a poor quality jigsaw of pieces stuck I by subsequent builders, window fitters and cowboys.
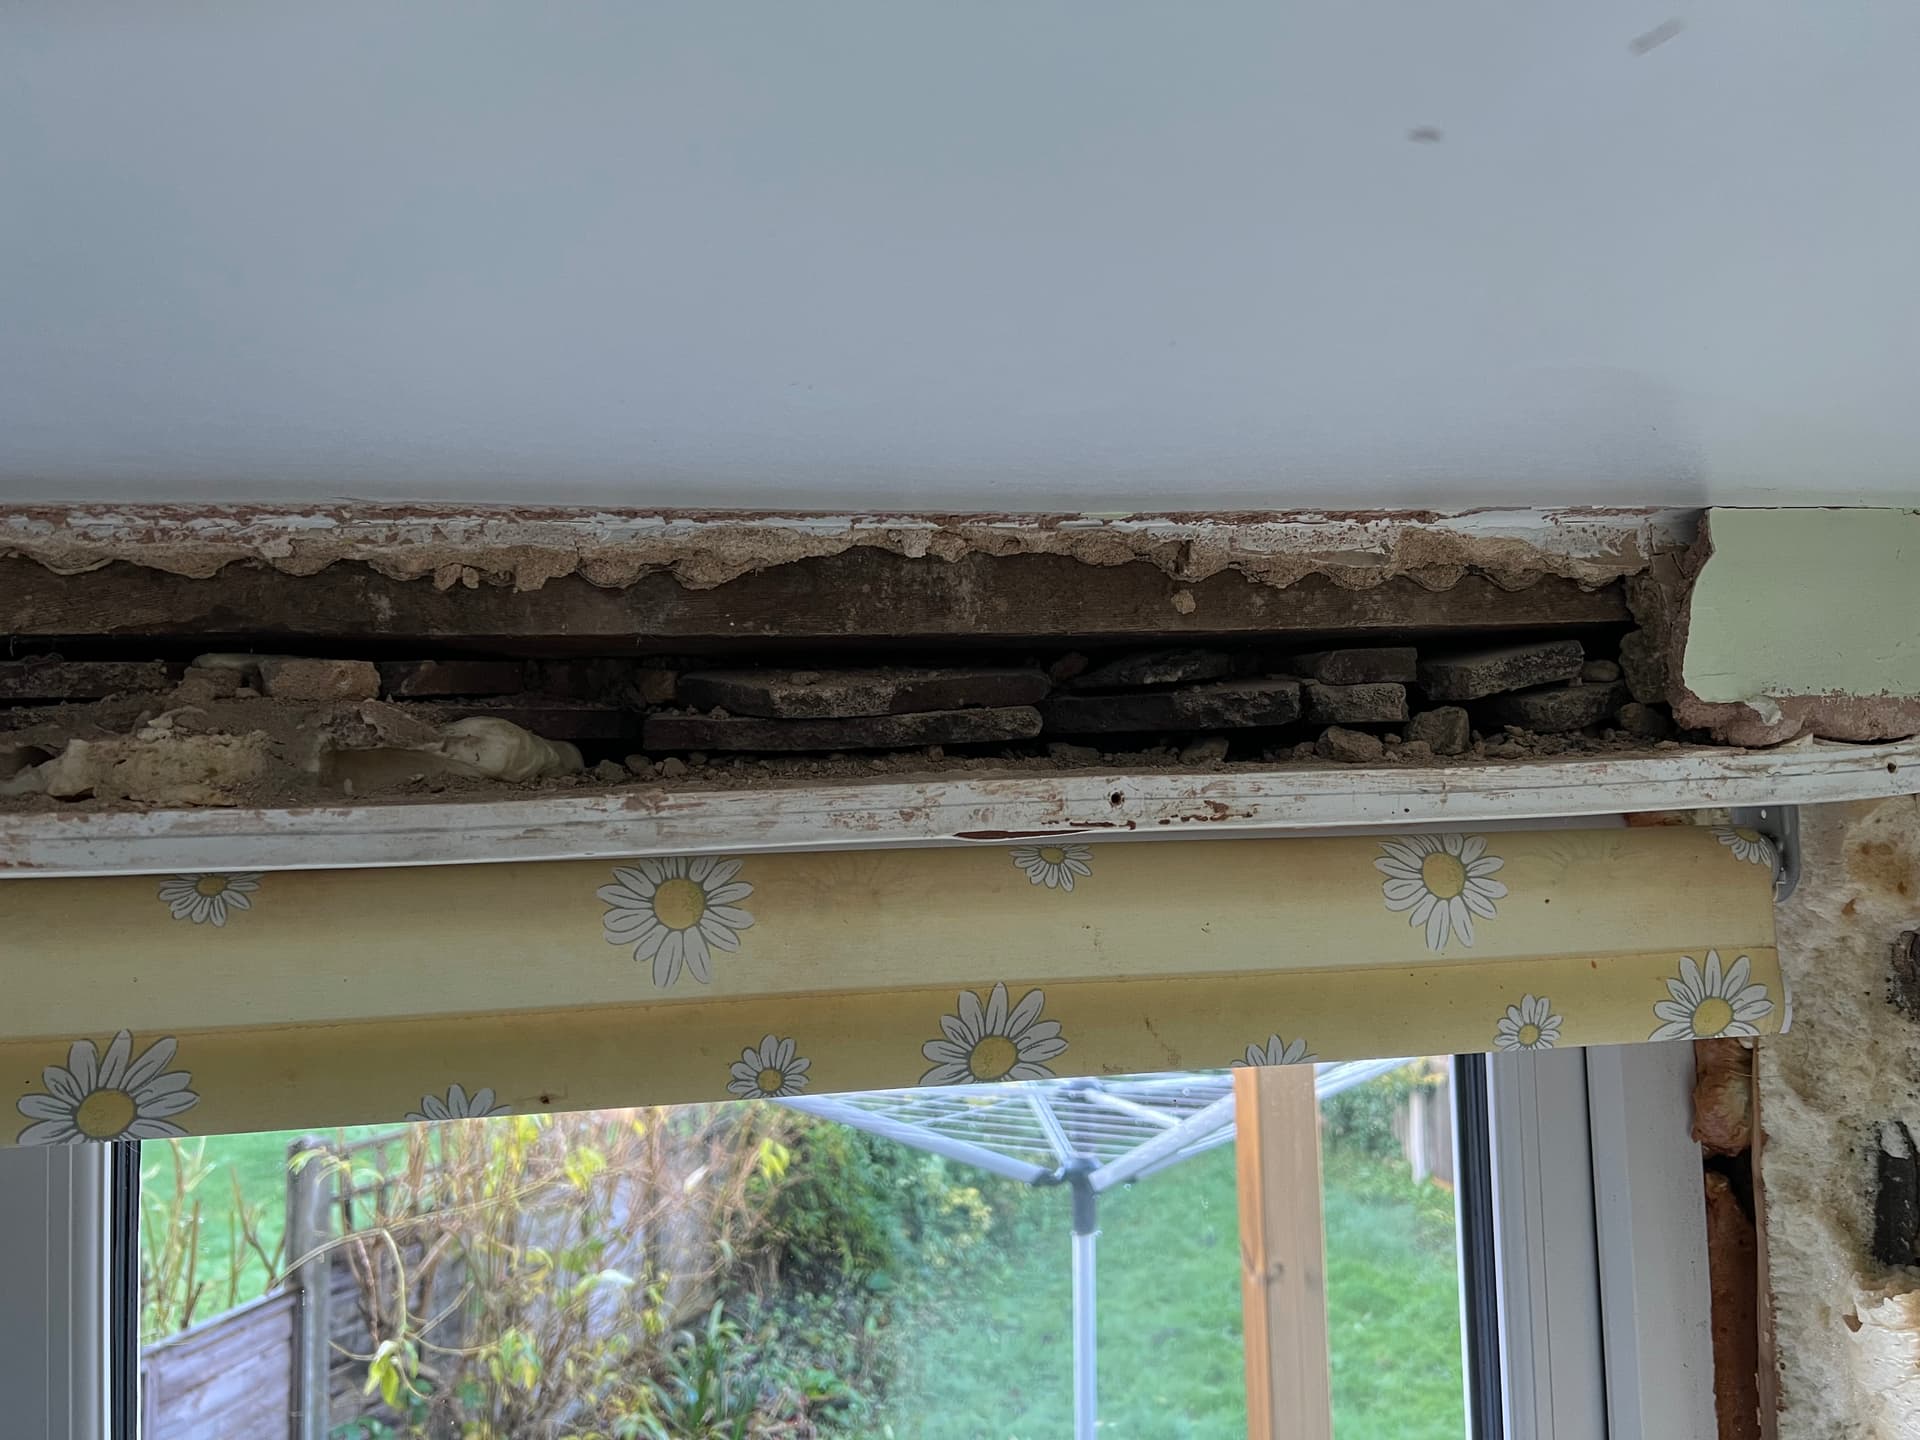
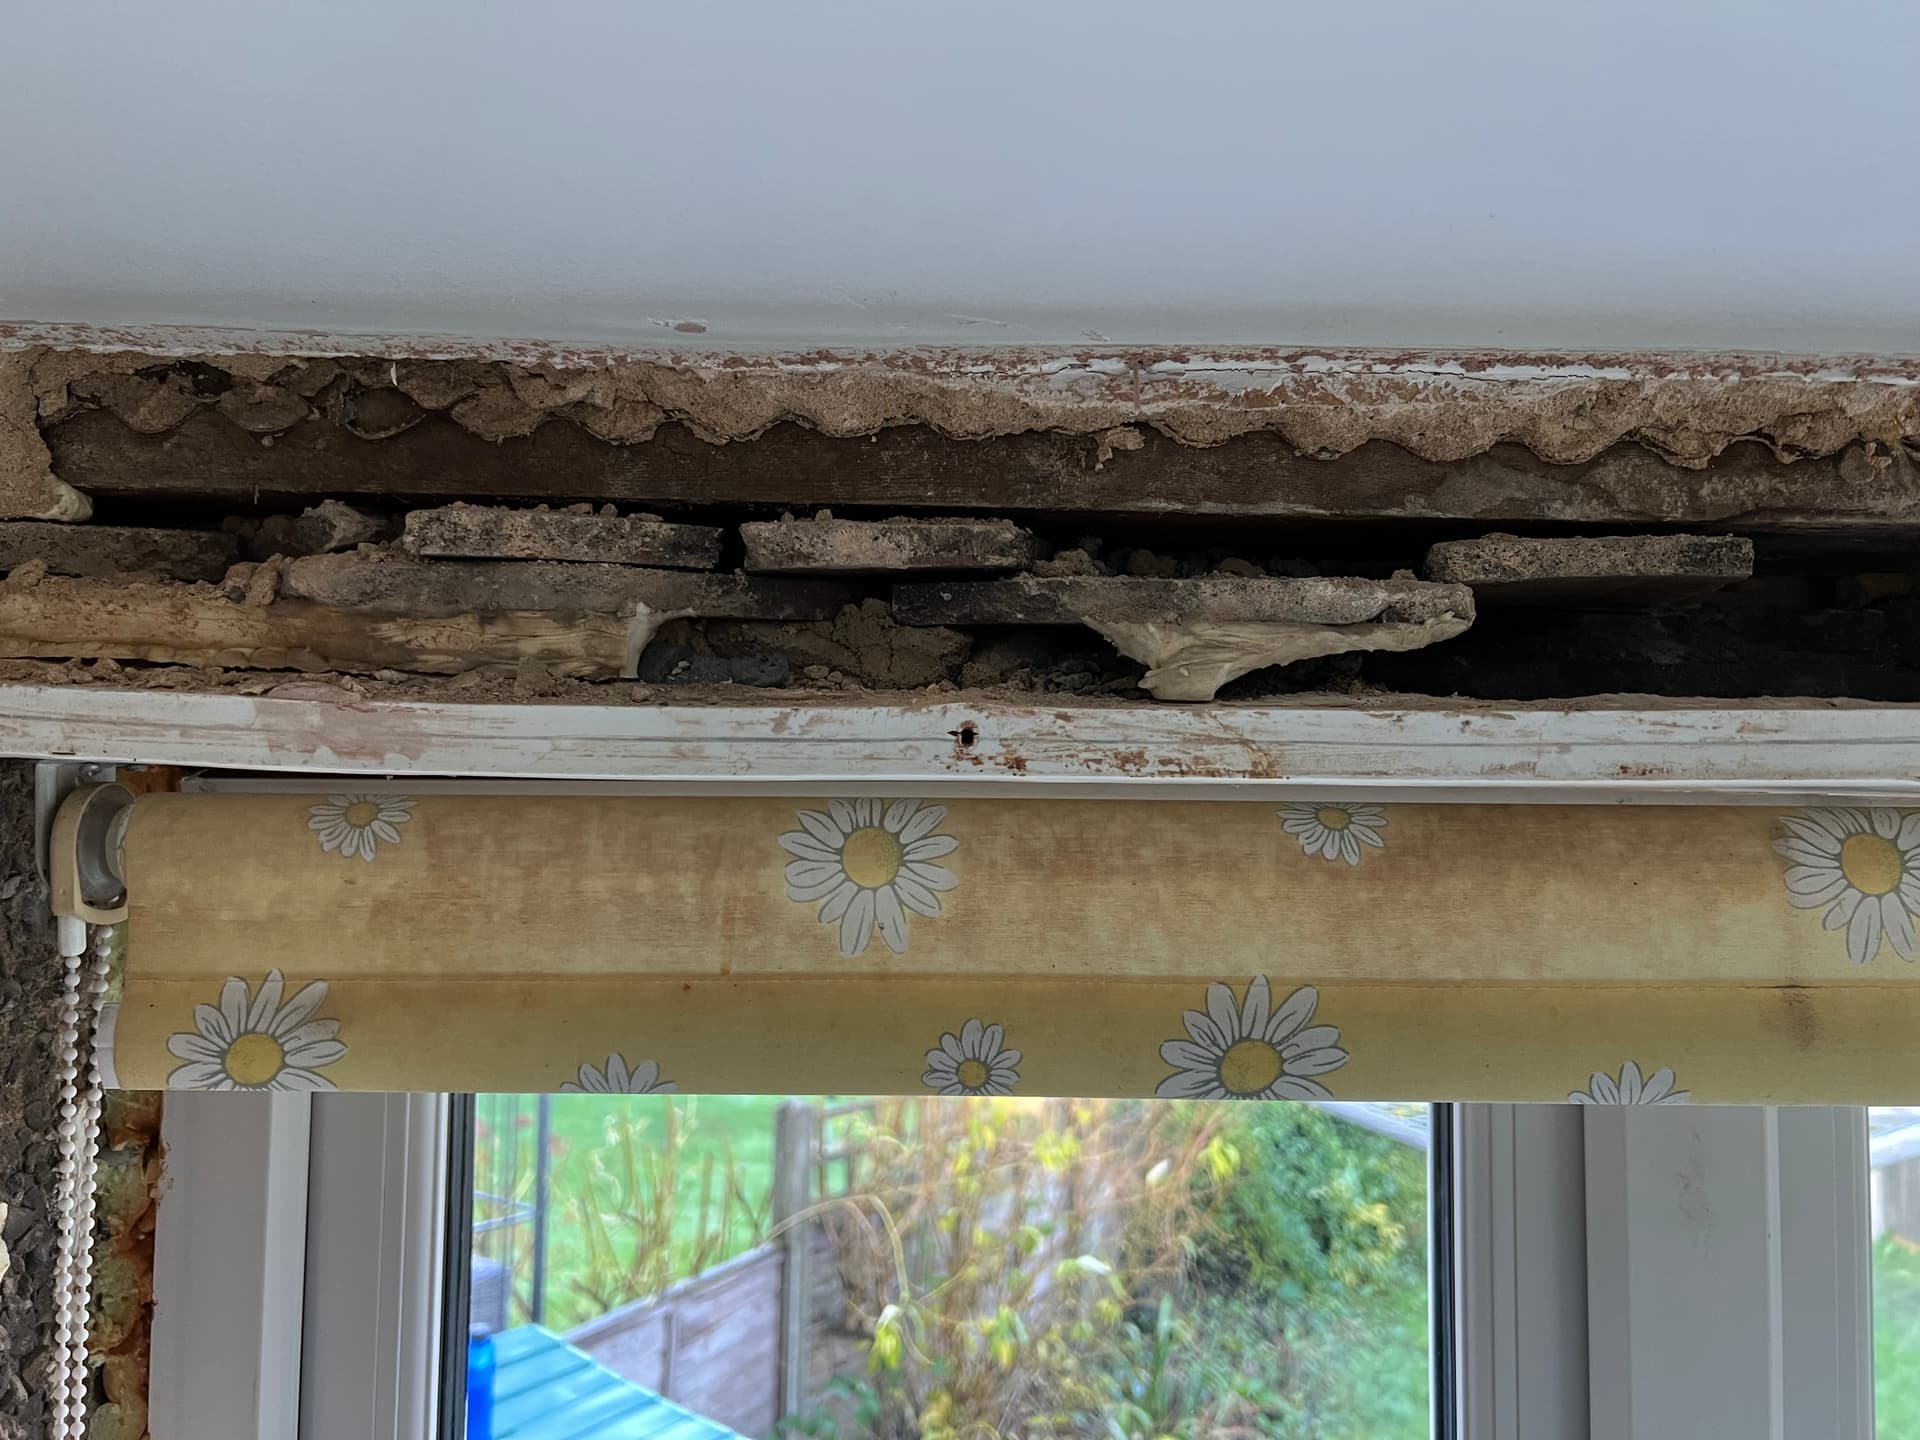
I have been able to excavate a space through to the replacement lintel fitted about 12 years ago. It seems it is only holding up the outer part of the (“solid” masonry) wall and a timber lintel, presumably the original, is holding up the inner part. The concrete lintel is deeper than the timber one. There was a concrete lintel before where the current concrete one is but it exploded due to iron reinforcements rusting and subsequently expanding. The job was done while we were on holiday, so I didn’t see the construction technique, but the replacement was only done from the outside.
I’m thinking that the packing to level out the top of the window was probably added in 1980, when previous owners replaced a door with a window. That window has since been replaced twice.
I am hoping that I can remove all the packing, remove the window board, replace the packing with insulation, insulate up against the concrete lintel and then again across the bottom to give a new flat surface that also insulates the top of the window frame. In between tasks a couple of coats of Blowerproof will, of course, be applied.
That is all more than I was anticipating but not too onerous.
1 Like
Tim
I’m no expert but these photos from our build up might help, although its of a new build extension.
I would definitely put some type of cavity closure in to stop air from the cavity circulating.
Below is the first part of the build up which you can see below the opening which is Superquilt
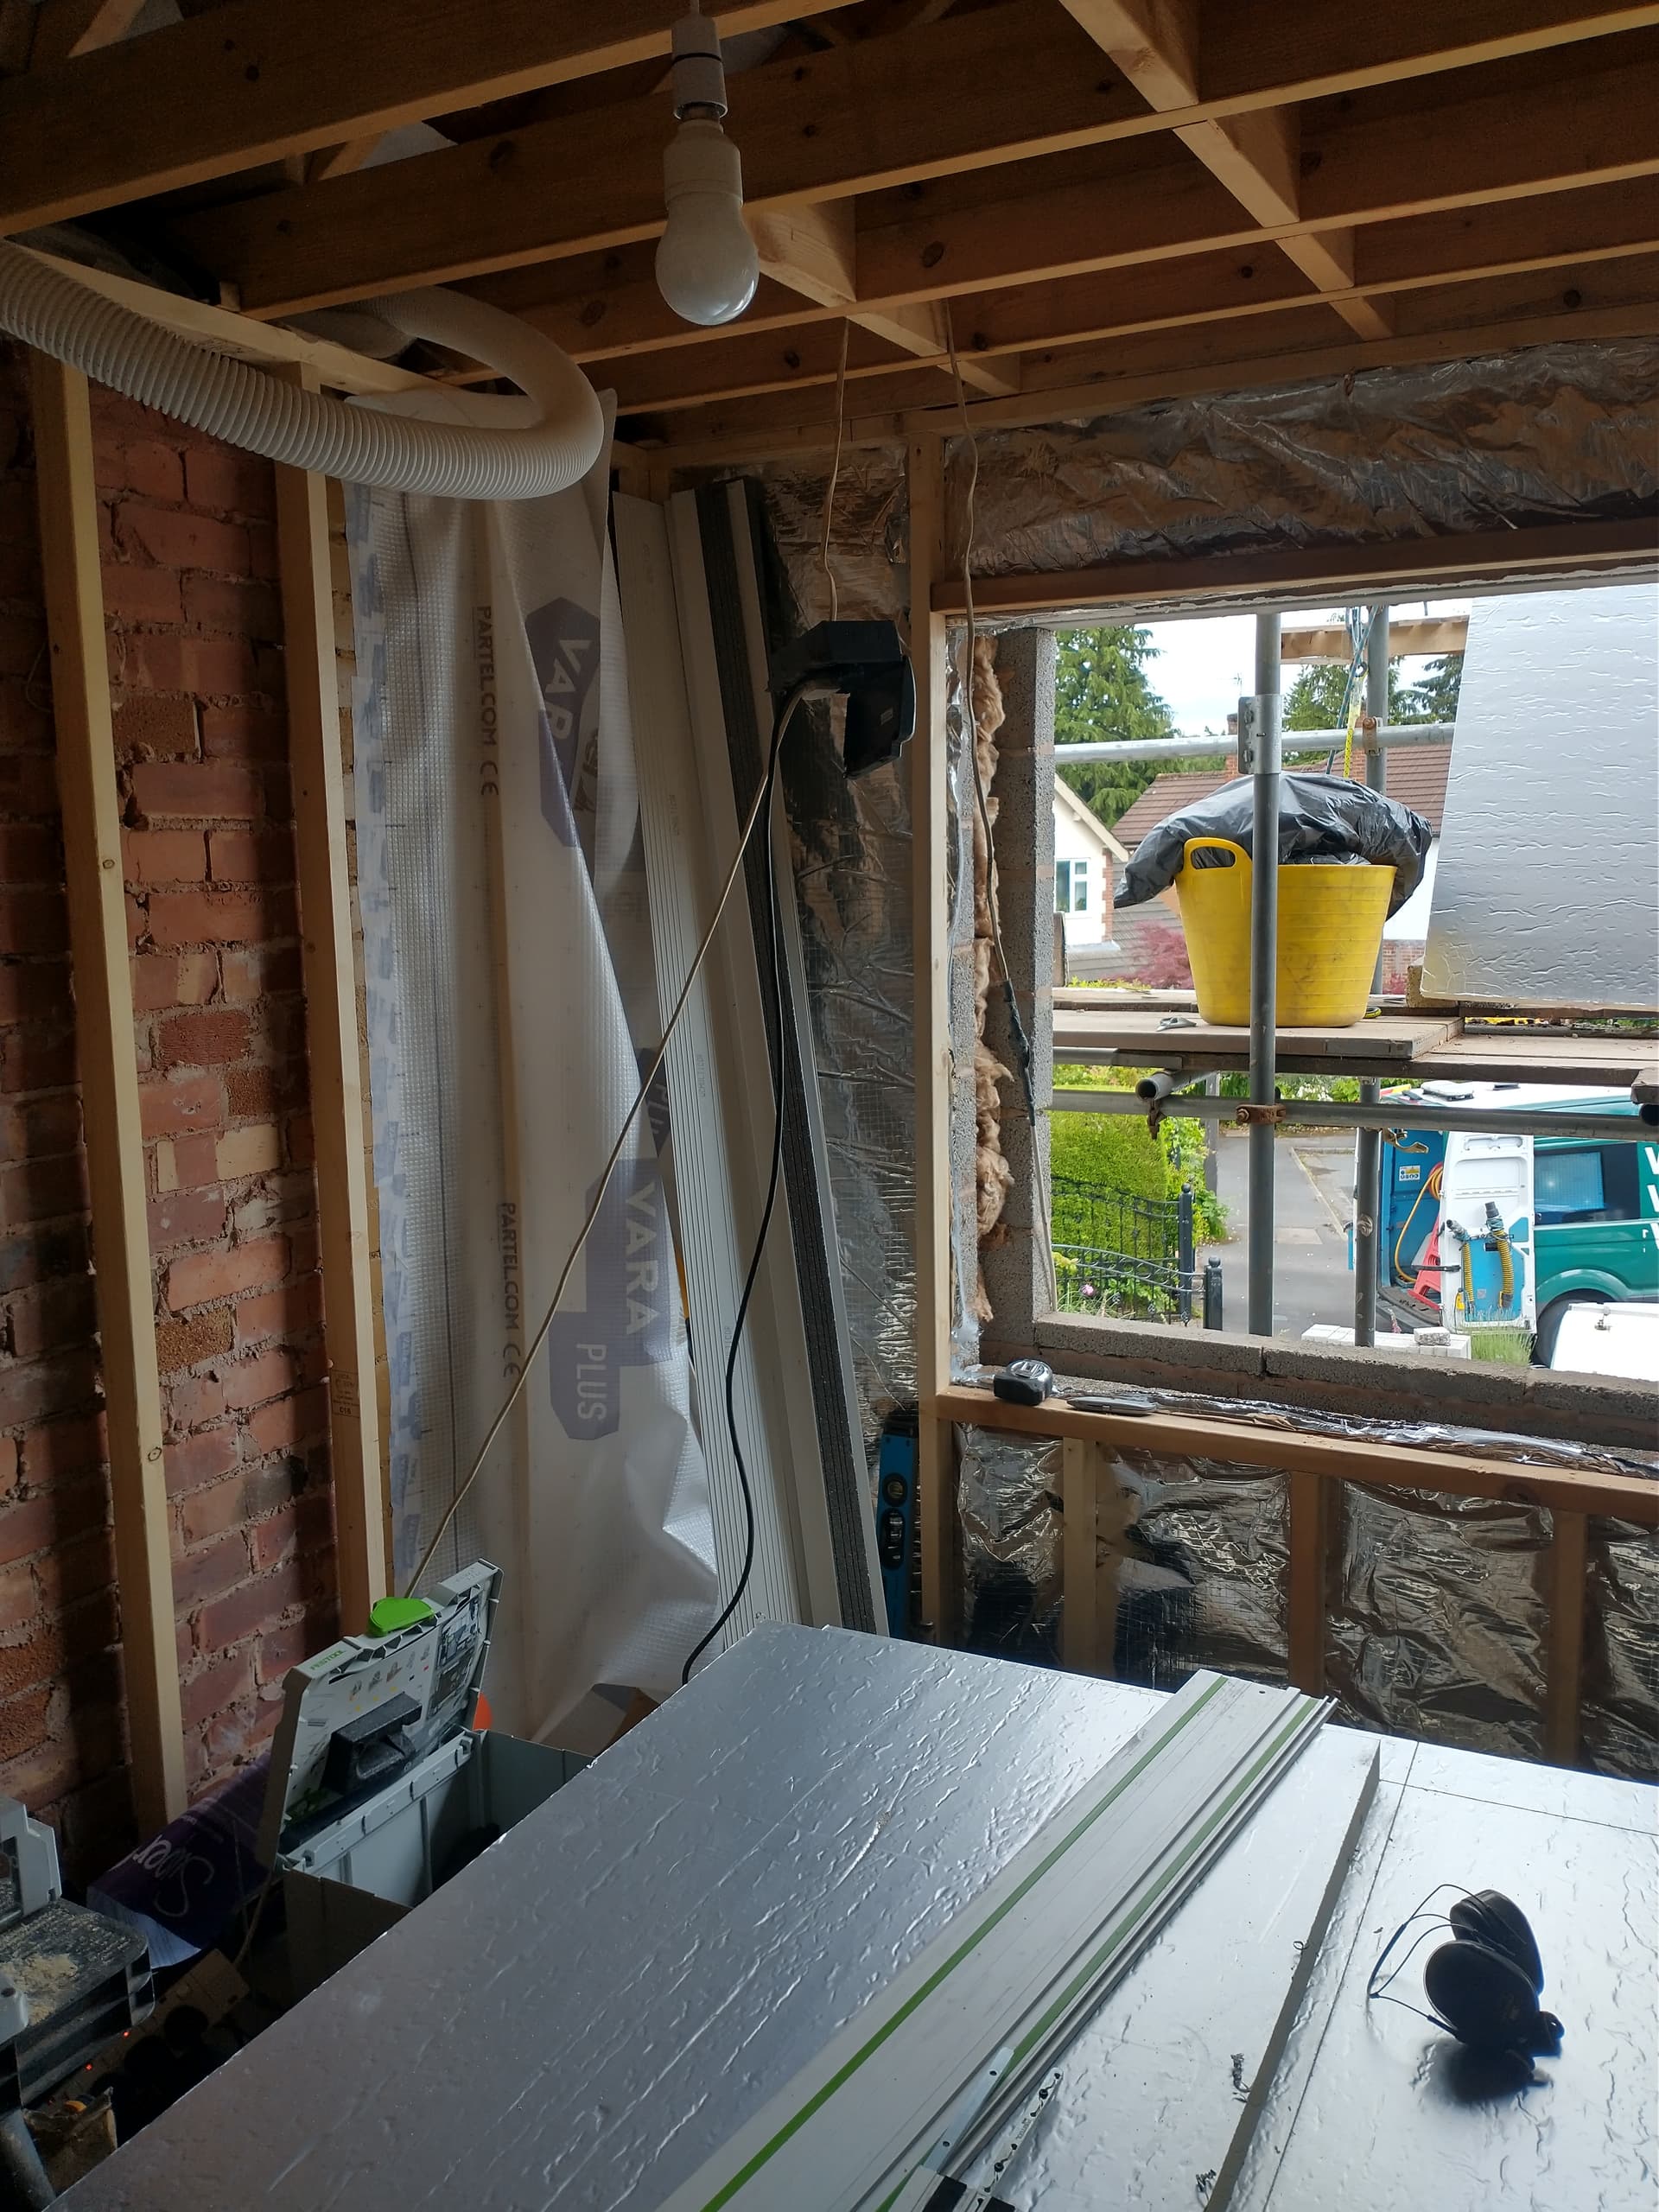
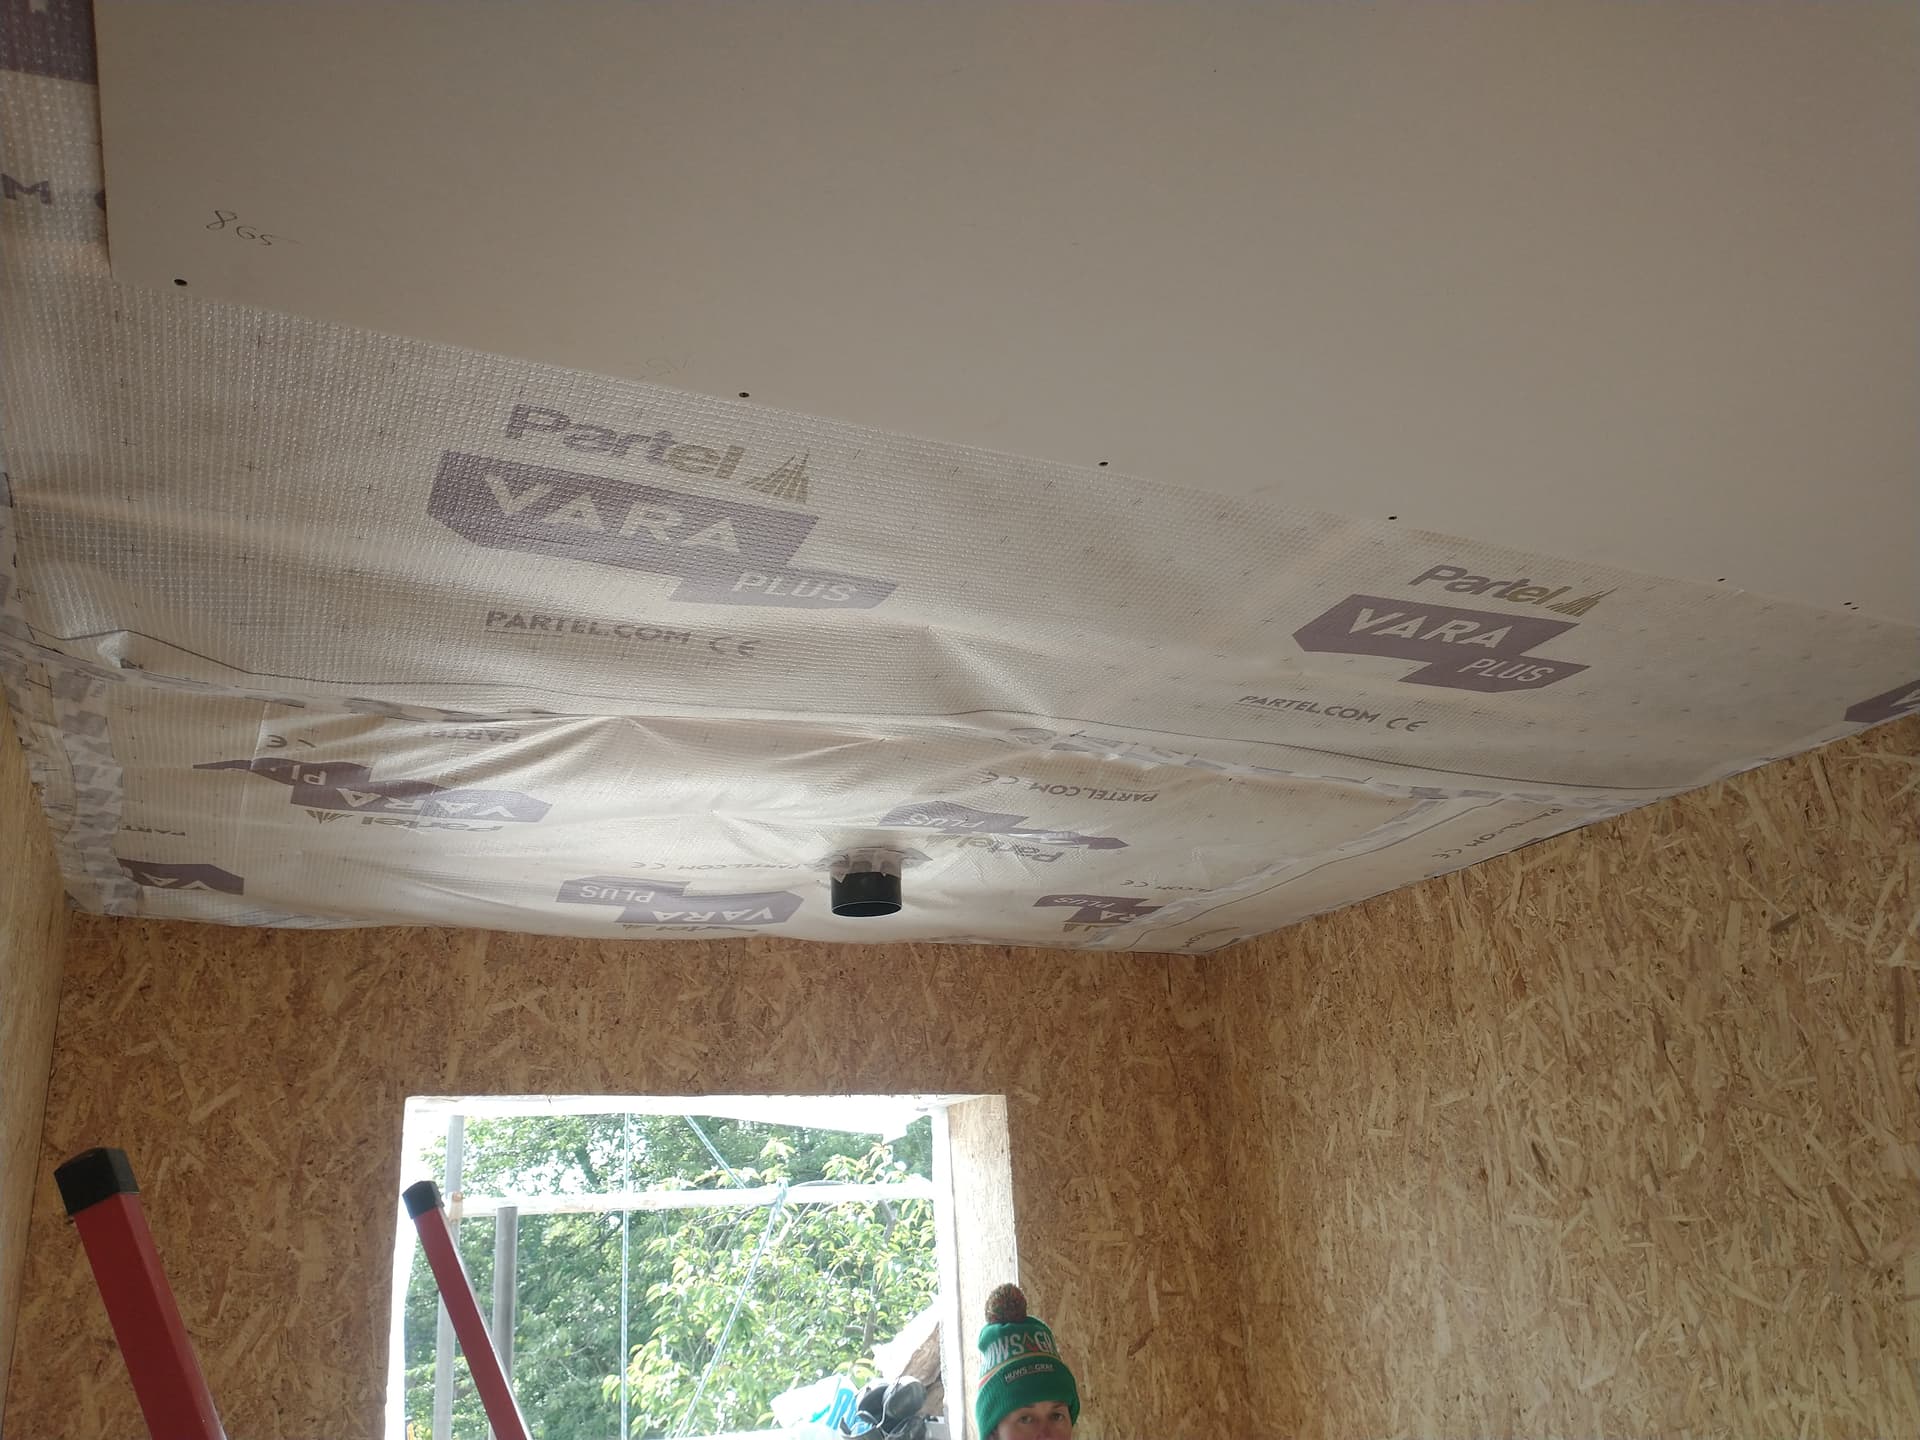
This was covered with 50mm UniLin board between the battens and then sealed with Partel Vara plus.
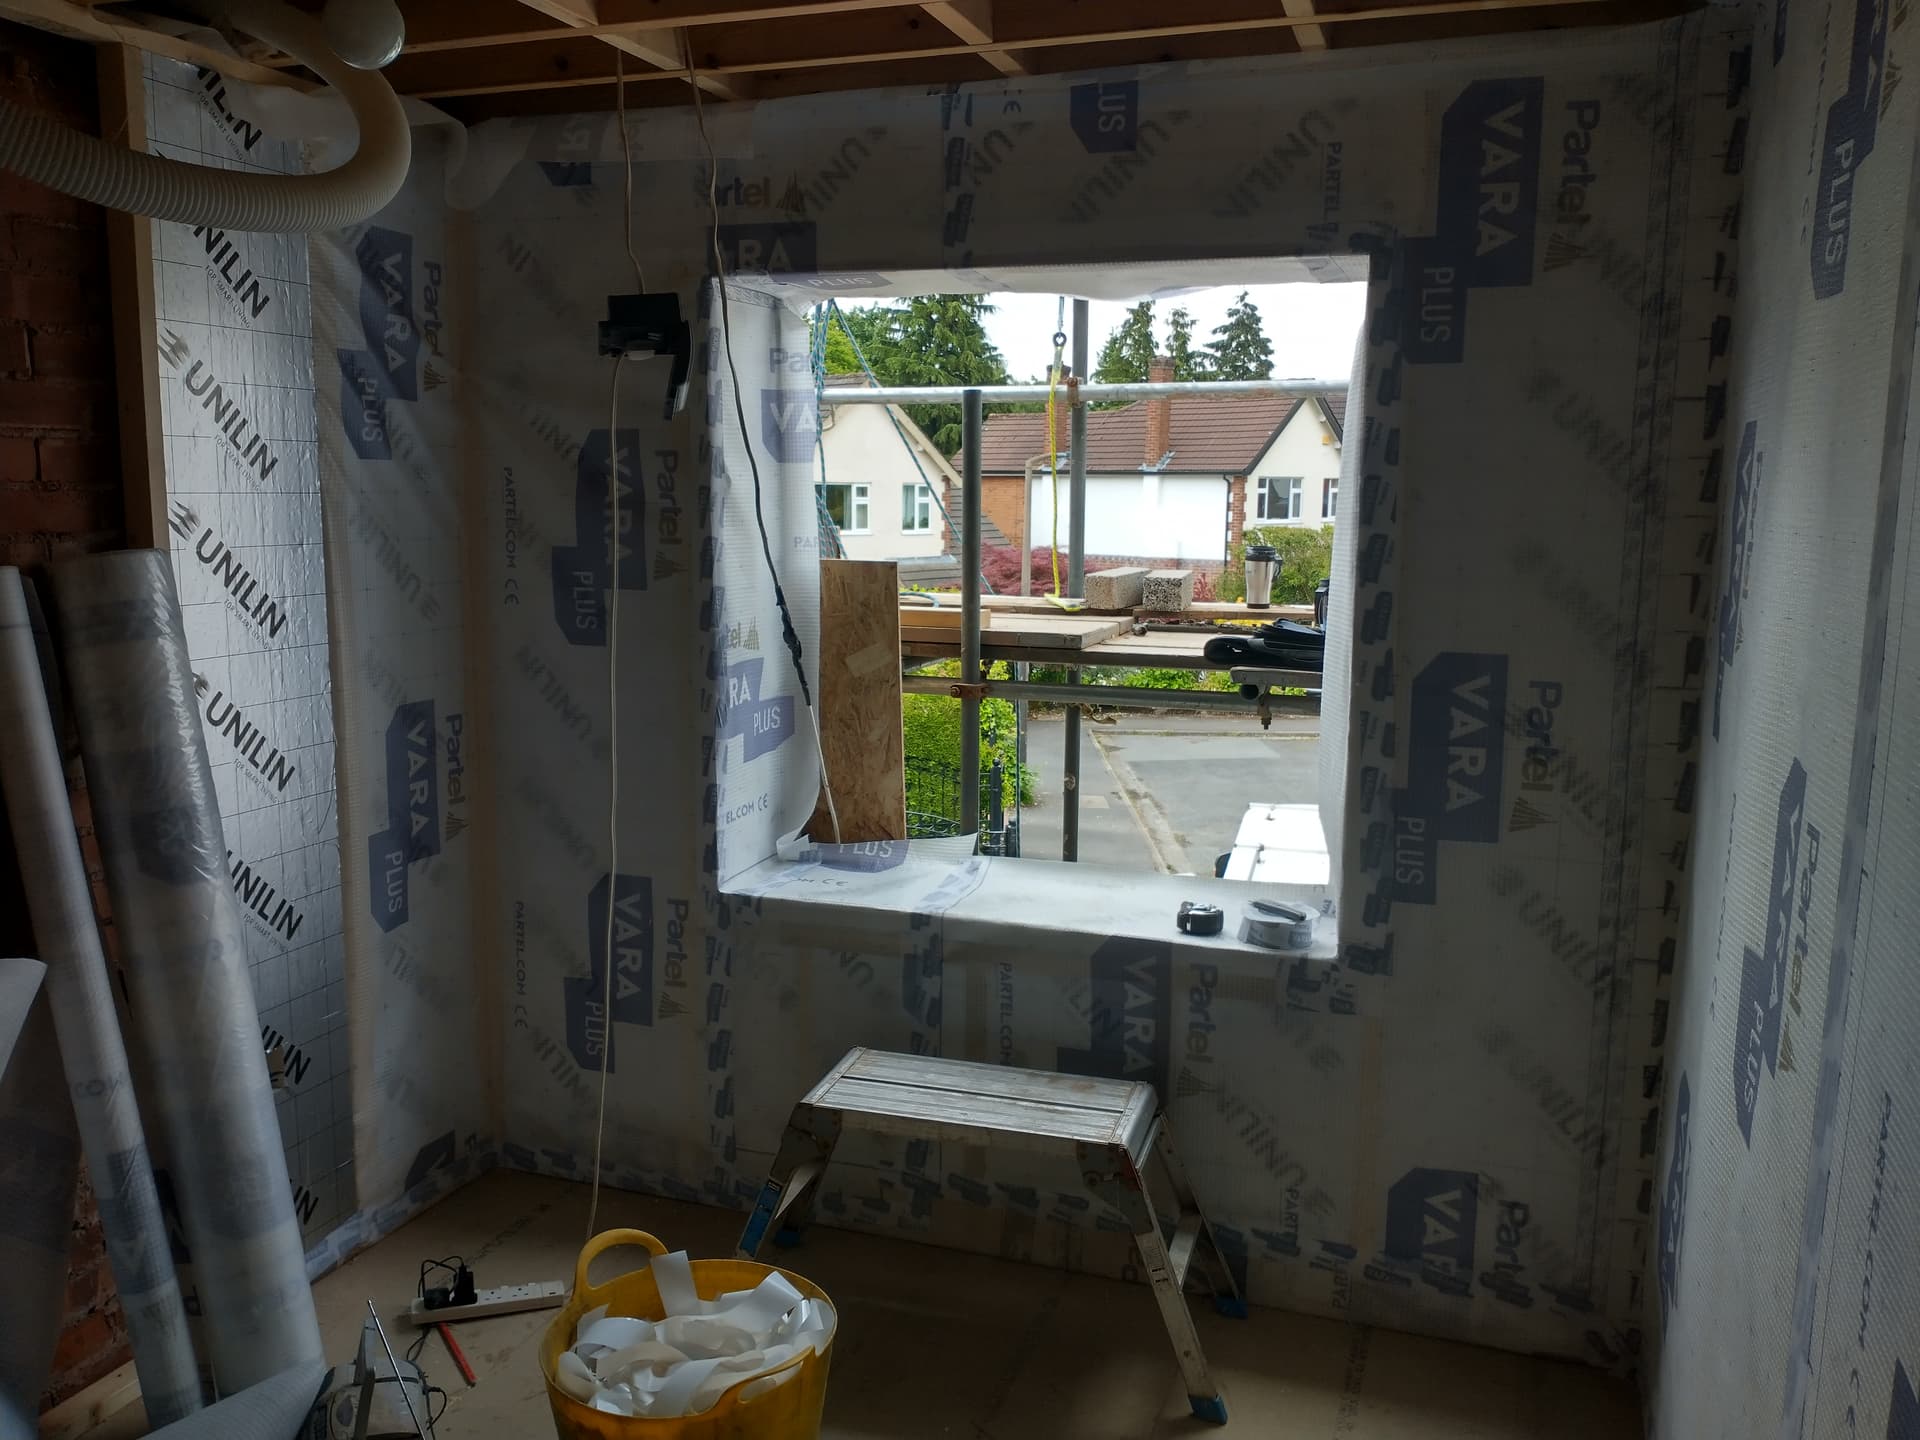
Which was then protected with OSB boarding. The plan was to seal the spare membrane to the window.
Thanks. I can skip anything cavity related as the wall is “solid”. By which I mean no defined cavity but full of voids.
For the time being I’m just insulating the reveals. This gives me a chance to make window to wall joins airtight and at the same time treat the edges of the wall. I am hoping to get EWI and maintain thermal mass. Very important for A2W heat pumps but not for A2A.
My local council refused EWI a few years ago but now more local houses have them and rules are being relaxed so I may be trying again soon. The house is not listed and it’s only architectural merit is that it has stood for 90 years.
1 Like
I know that this forum isn’t the best place for a quick reply, except perhaps from me ![]() but I am hoping for some prompt advice.
but I am hoping for some prompt advice.
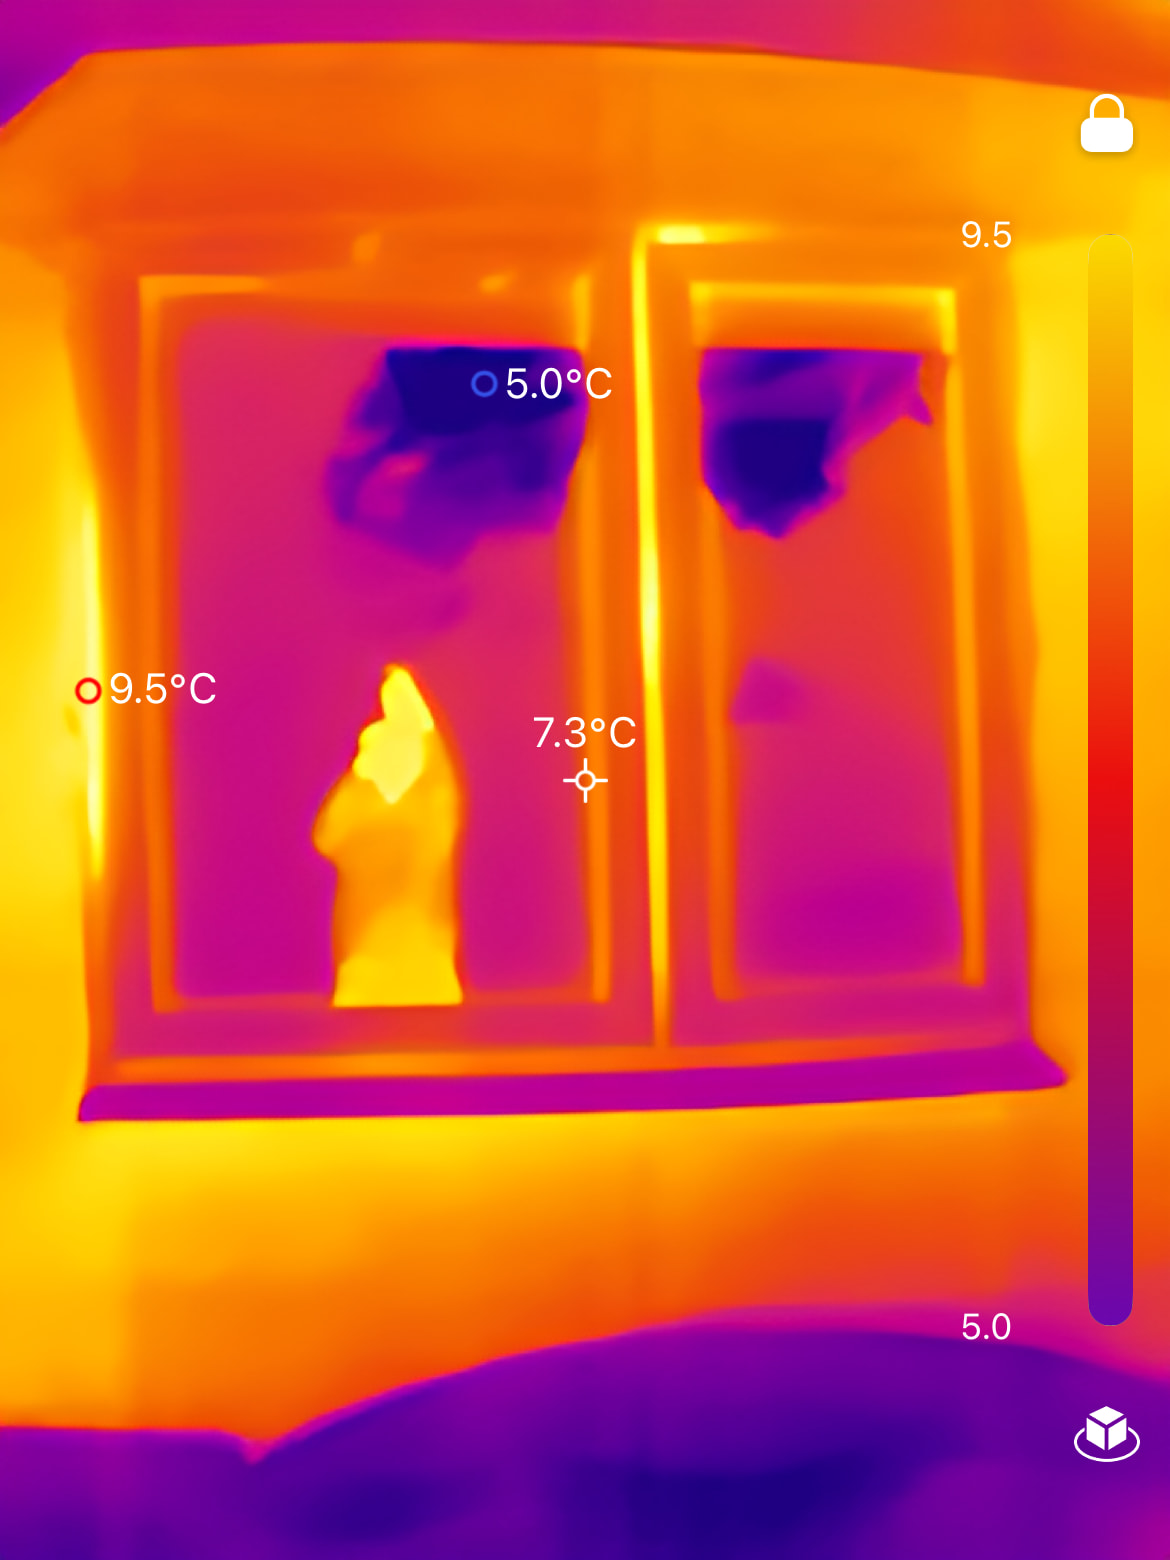
This is the thermal image of the top of my window this evening. Not particularly cold out but a good wind to show leakage.
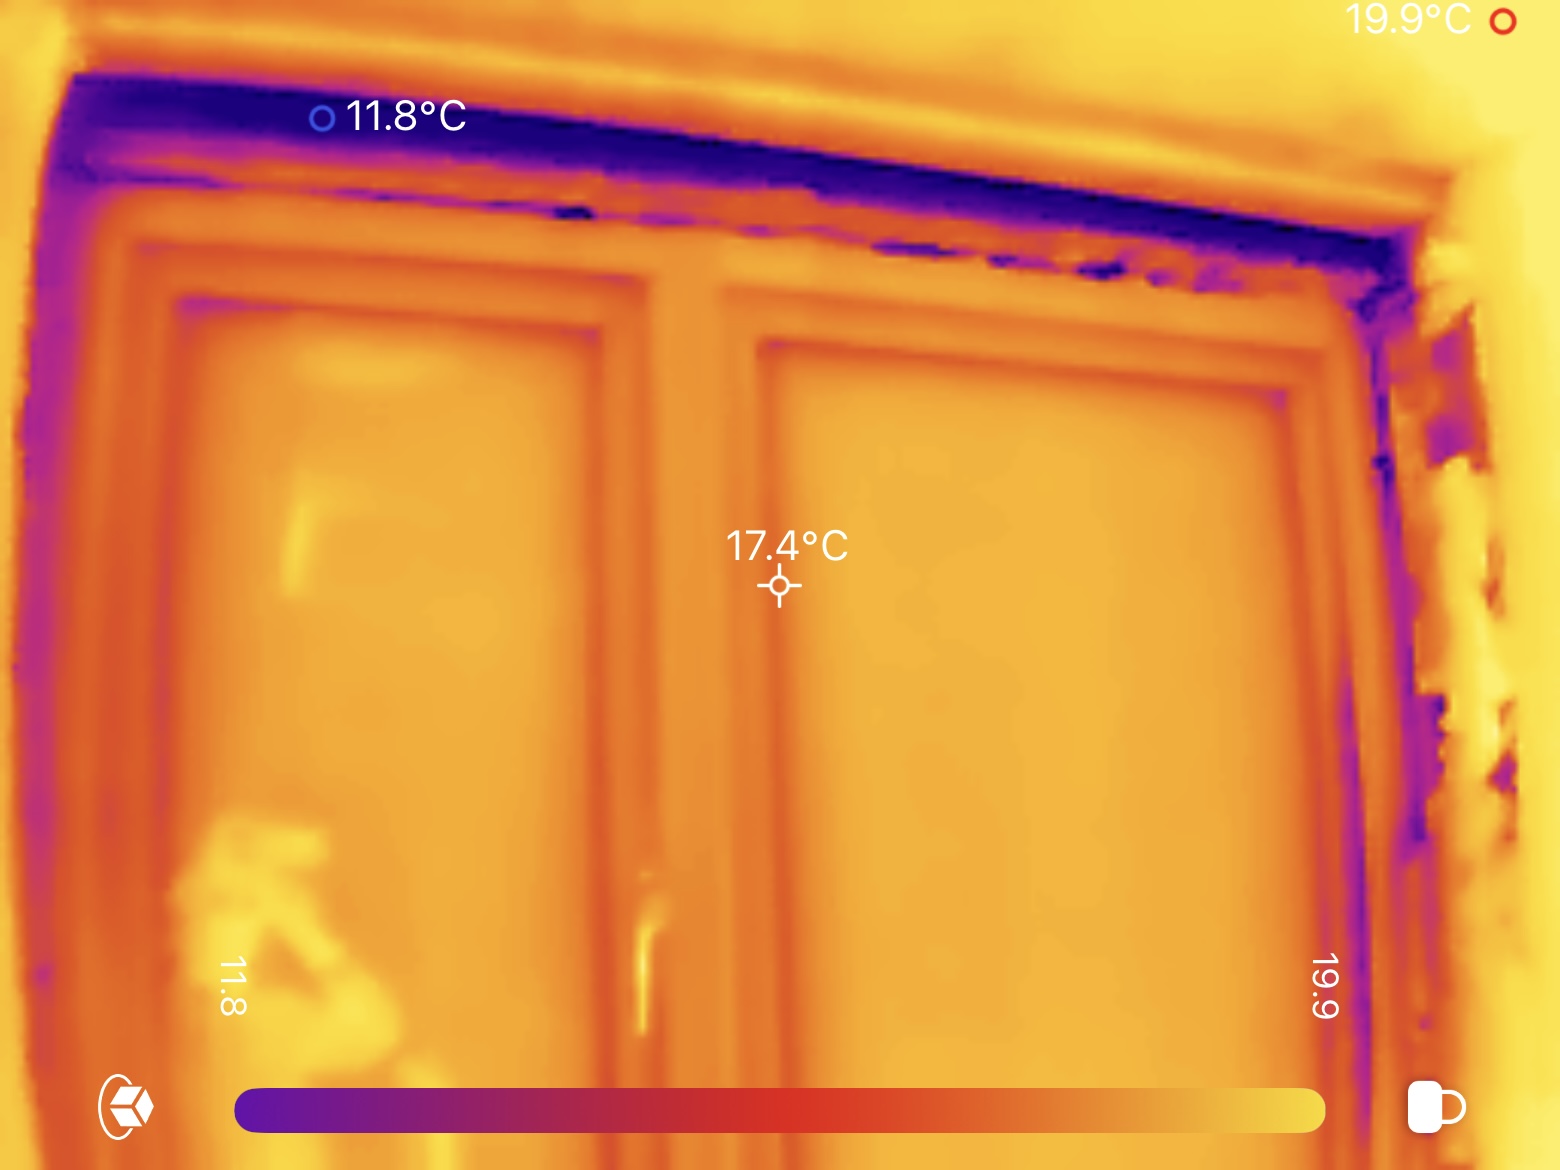
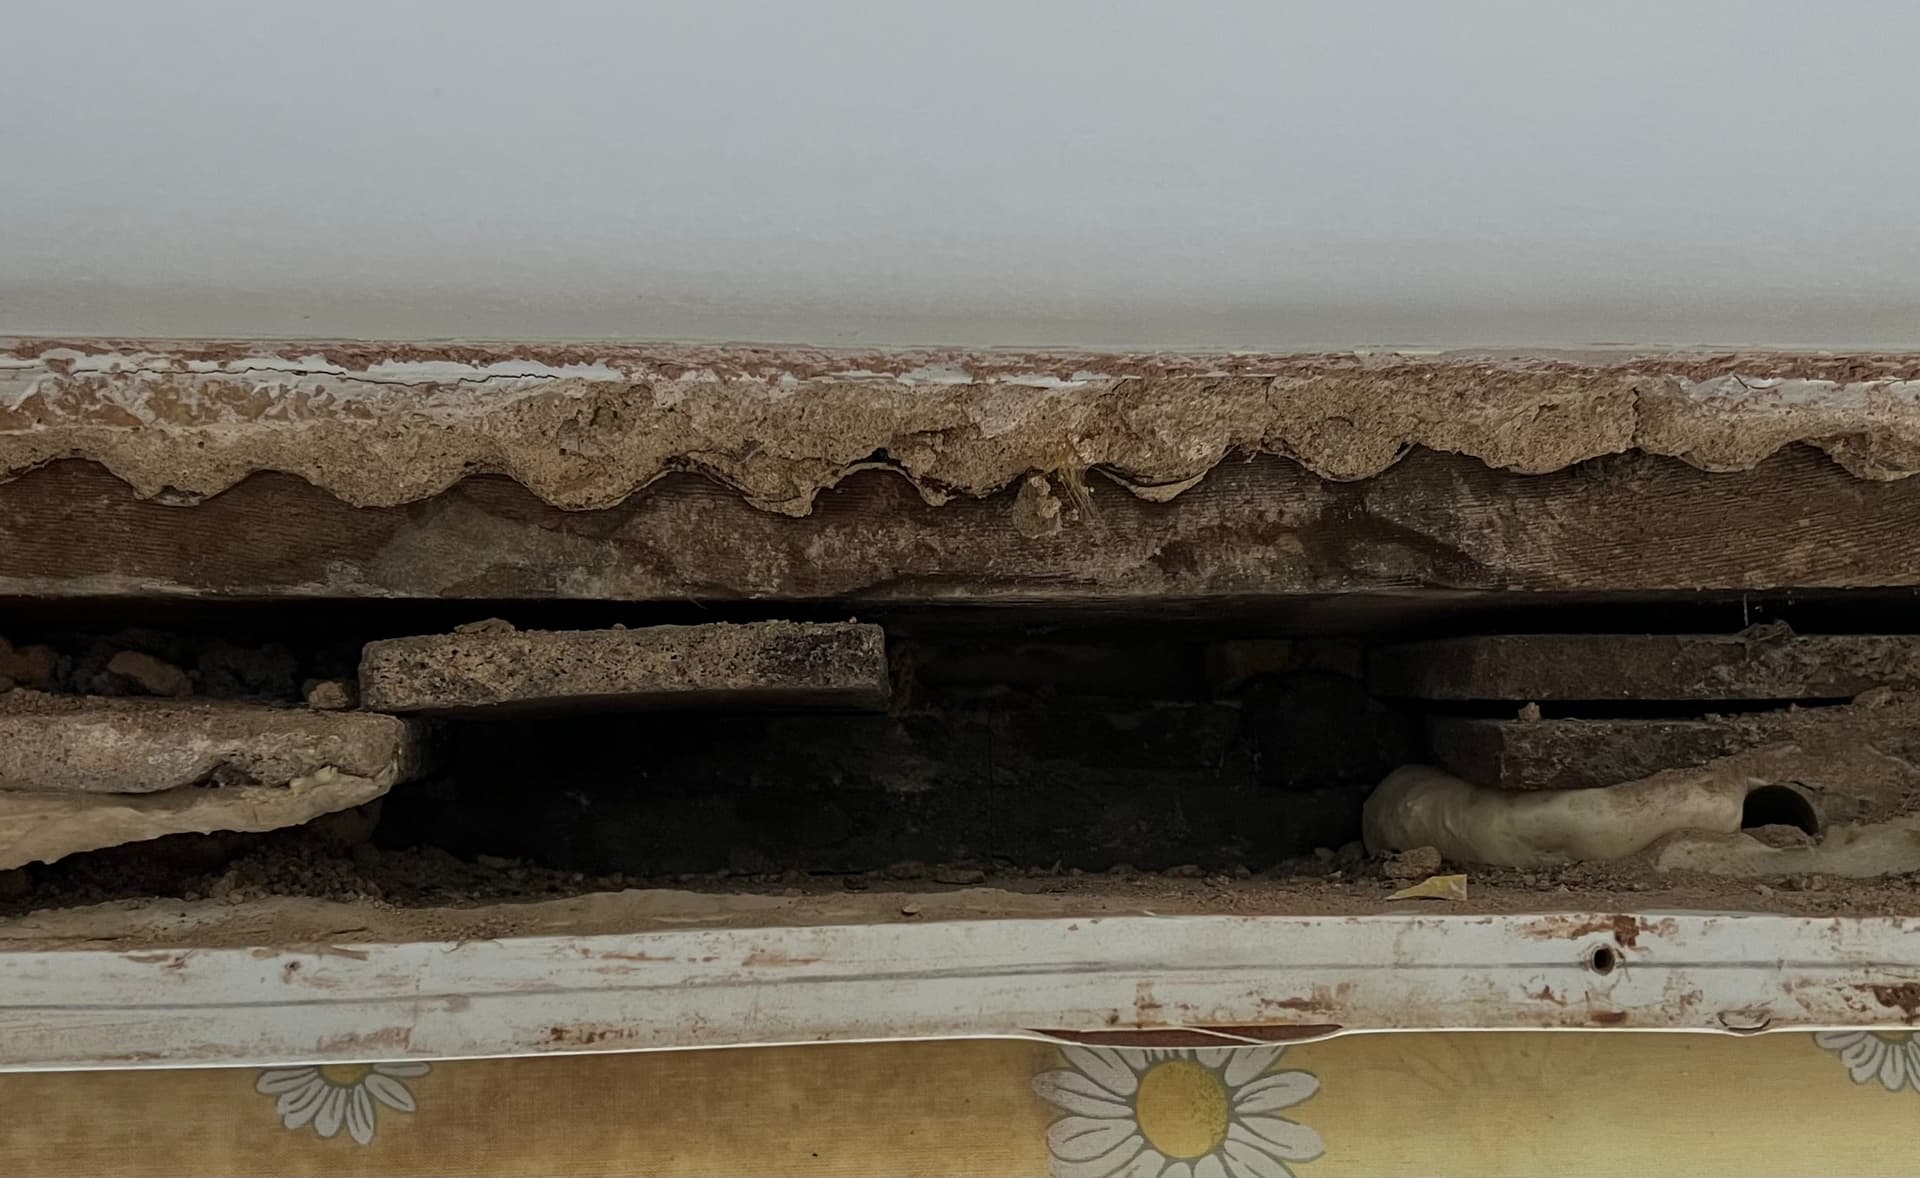
As you can see there are two sources of leakage along the top. There are gaps in the foam sealant and another between the two lintels.

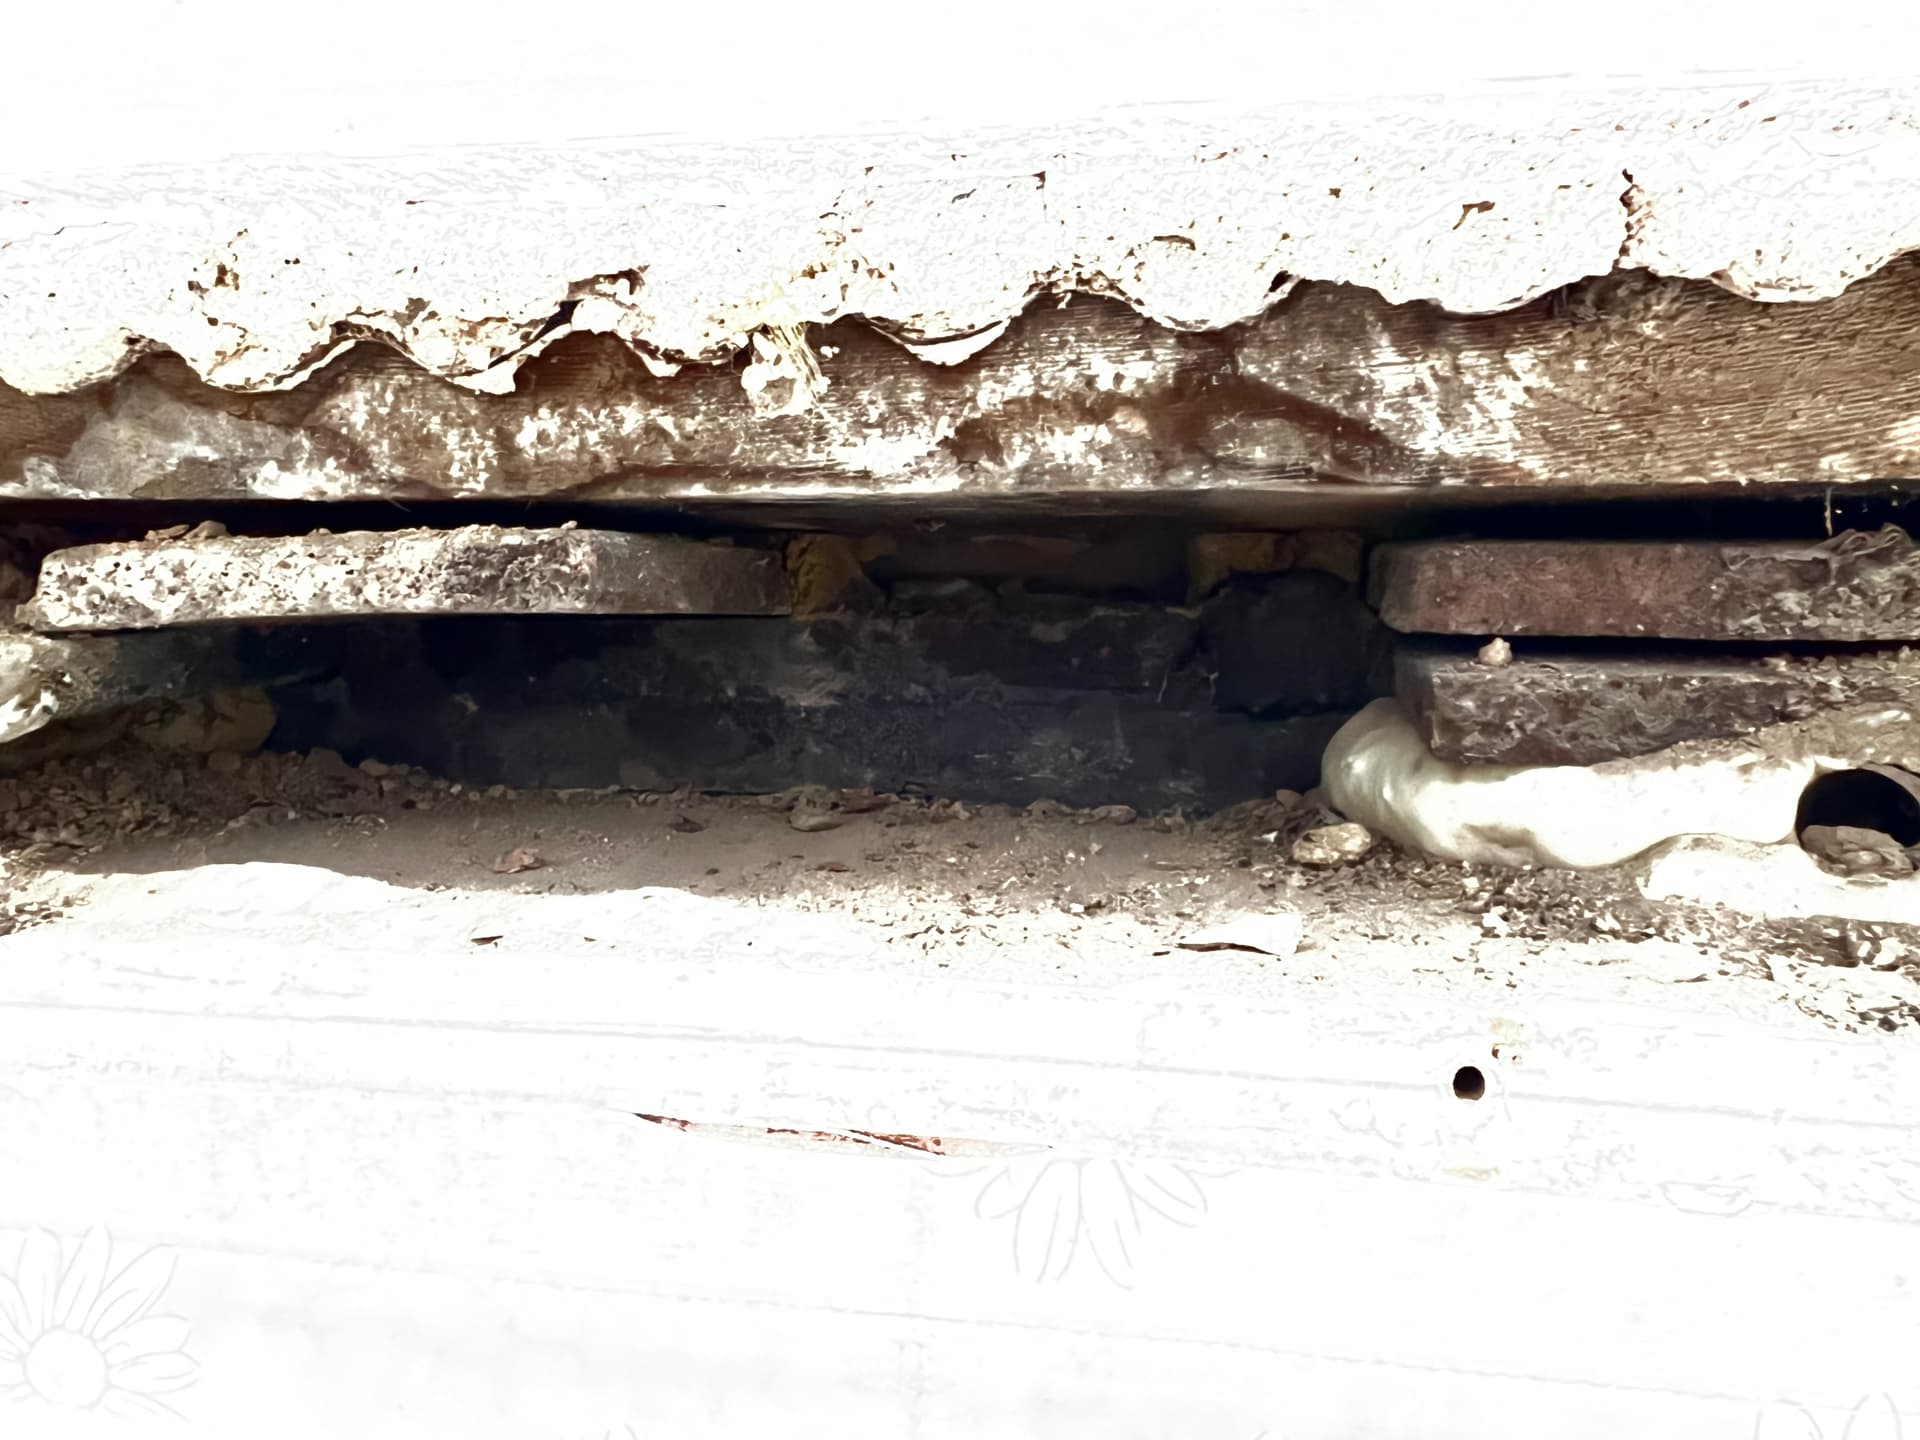
There is a gap of about 7mm between lintels. There were a few mortar snots from when the outer lintels was replaced. The gap seems a good idea from the perspective of damp penetration to the wooden lintels but there is a howling gale between them. My initial inclination was to retain the gap and seal across it but then I wondered about a strip of raised polystyrene pushed up between them and that air tightened relative to the room. A quadrangular section of insulation would then be fitted below the inner lintel and abutting the outer one to give a flat surface before a layer of insulated plasterboard is attached below. To help support the board I would use contact adhesive and support at each end from the newly plastered sides. Meanwhile the foam above the window would have been completed and also sealed with airtightness product. The one to hand, that I use for all my fiddly little jobs, being Blowerproof.
So, who will offer me a sanity check?
Edited to correct the dreadful punctuation that made the post difficult to read. I wrote it too late at night to think clearly.
Just to clarify, I thought you said this is a solid wall… So how can there be a howling gale?
How is the wall made up?
In any case I would feel like closing that 7mm strip with some EPS to protect the wooden lintel from the moist air as well. The older wooden inner lintel should still be able to breath and dry to the inside anyway so I wouldn’t think leaving the gap would help with protecting it.
Anyway, just my 5 cents.
I also just got 2 new windows and 3 new doors (NorDan) installed yesterday and very happy, although they will have to return to do trims etc.
I did ask my builder to add a cavity closer (only 50mm cavity) and will have to think about what I do next. There is so much detail to digest…
Indeed. Retrofitting your home is an exercise in constant mental gymnastics and sometimes physical gymnastics too.
1 Like
I said that it’s a “solid” wall, so allegedly solid but actually not.
The wall is riddled with voids and cracked bricks, many of them interconnecting. There are also a few cracks in the external render. Also the walls are not plastered or rendered in the underfloor void. This alone gives scope for air movement if not a gale. It does however reduce water penetration. Why there is a gale I do not know, it may become apparent when I eventually get EWI fitted.
My Passivhaus qualified architect didn’t specify a separate airtight membrane for when fixing the EWI, which I queried but he felt that the EWI itself would be airtight. This goes against AECB advice, so I will probably also be fitting airtight membrane. This can then be fixed to the already air tightened window reveals.
The master bedroom is next, and last, on the list but a much bigger job. I’ll need to send Mrs G on a much longer trip while that’s being done. She is currently well out of earshot in Zambia.
2 Likes
Very good. Looks like EWI will be a good idea indeed.
What kind of insulation are you using?
I am fitting EWI on my relatively small kitchen extension while I also replace the flat roof. I will have 150mm Mineral Wool (Rockwool NyRock) and wood cladding. I definitely need a breather membrane to cover it before the cladding goes on to protect it from the rain while installing. I am looking to use Illbruck ME011.
My architect specified PIR. Once we are ready to go I’ll query that. 145mm downstairs and 155mm upstairs, to give a lip to the first floor insulation and reduce runoff.
I would probably encourage the changeover to be a little below ground floor ceiling height to give maximum insulation to the inter-storey void. Along the top of the window line seems a good place for an architectural break.
The bottom metre I would prefer something more tolerant to flooding. We currently get 1-2cm flash floods once in a blue moon, and with climate change that could get seriously worse. I was thinking of extending the footing insulation to that height and injecting another DPC also at a metre as a form of resilience.
1 Like
The lip sounds like a good idea.
I would research the type of insulation, purely because you said you have solid walls and having Mineral Wool will allow this to breath.
What is your detail below DPC? My architect suggested XPS below the DPC (at least 300mm from DPC down, but maybe better to go a bit more).
To protect from water XPS would be the way I believe. Don’t know what to do when there is an actual flood, but I would imagine it would be good again to have something breathable that can actually dry out at the end.
I too was thinking of mineral wool. Yes, XPS for below the DPC down to the footings, which varies around the house.
1 Like
Do your photos show a cold ‘bulge’ between the outer part of the window and the frame, on the right side (as well as the leaky reveals)?
I’ve recently done this job on an upstairs window - remove trim (inside) at reveals, fill reveal-gaps appropriately and render; do similar along top but using PIR board cut to size/pushed in and then airtight tape; remove windowsill and close off top of cavity with PIR board and airtight tape. I’ll wait til it gets a bit chillier at night, then do heat-cam photos and compare against other similarly-treated/installed new windows, and against older windows that I haven’t tackled.
Yes, I have found 3 panes that have this problem. The kitchen is the worst. It might be possible to adjust the other 2 myself as they are opening casements and adjustable. The kitchen one is not opening and requires a glazier.
Incidentally, I ordered without dummy casements but this is what turned up for all the back of the house but it didn’t come to light until the old windows were removed. I didn’t fancy being windowless for 2 weeks while a new set of windows was manufactured.
I was offered a little compensation for the wrong windows being supplied but meanwhile I have heat loss from the casement frames, their poor fitting and the fact that future EWI will have to cope with them
Probably too late to the conversation but anyway I agree with Christian that it’s hard to see a problem with your timber lintel insulation proposal. And if you do install EWI later, that will provide complete insurance.
Your architect’s EWI advice sounds very poor. Rockwool sounds good. I believe that, like internal plaster, external render is considered to provide a satisfactory airtight barrier. Abutments (e.g. to windows and doors) require airtight taping, as do cracks in the render if they are not repaired in some other way.
I’m using external render as the airtight barrier for my own EWI. One disadvantage (compared e.g. with using internal plaster as the barrier) is that if leaks become apparent, there’s no way of getting to them for repairs. But that’s primarily a problem in a building contract context with blower door tests. For DIYers with obsessive attention to getting it right in the first place, the problem (hopefully) does not occur.
2 Likes
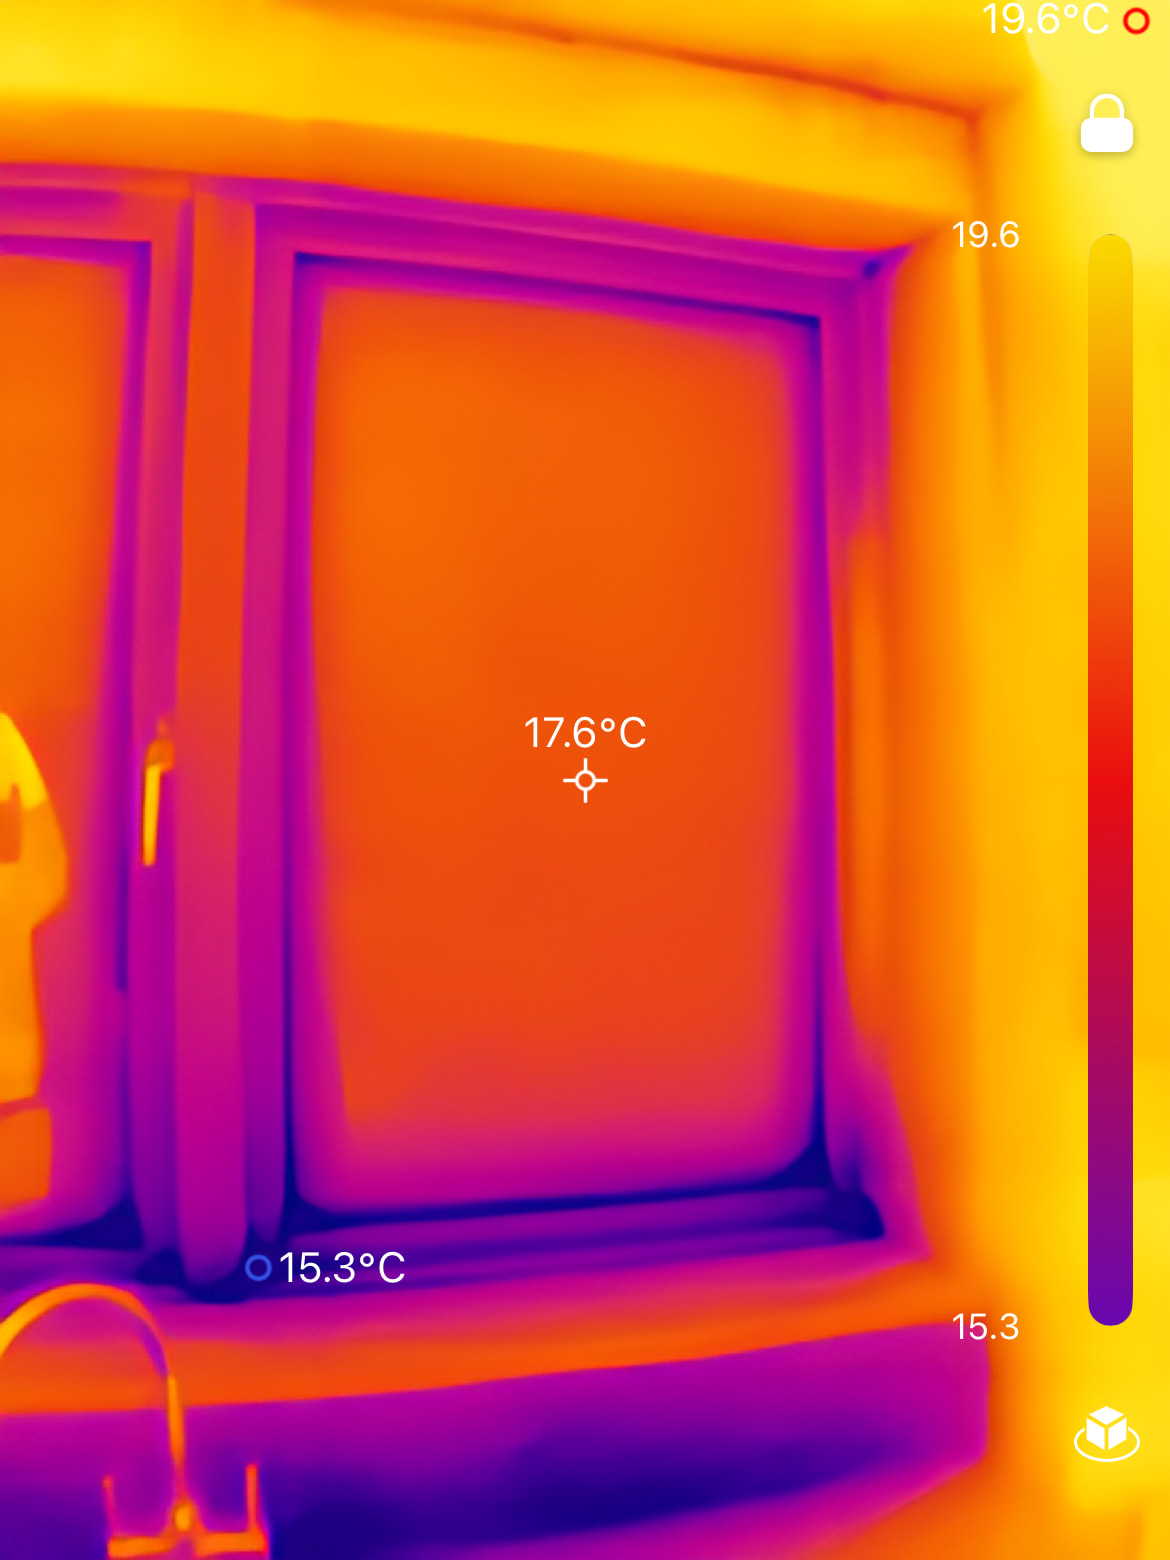
I thought I had finished this job, apart from decorating, and took some thermal images from inside and out. I see that I have a gap in the insulation top right of the window. What a pain. Before decorating I think I need to punch a hole into the void and fill with spray foam. A small patch shouldn’t impair overall breathability significantly.
The glazing needs fixing and I need to find someone to do that (the installer having gone bust). But that isn’t particularly relevant to this thread.
I attach the photos. Anyone have any errors or omissions to raise regarding the reveal?

Inside
Outside
and a couple of angles inside shots
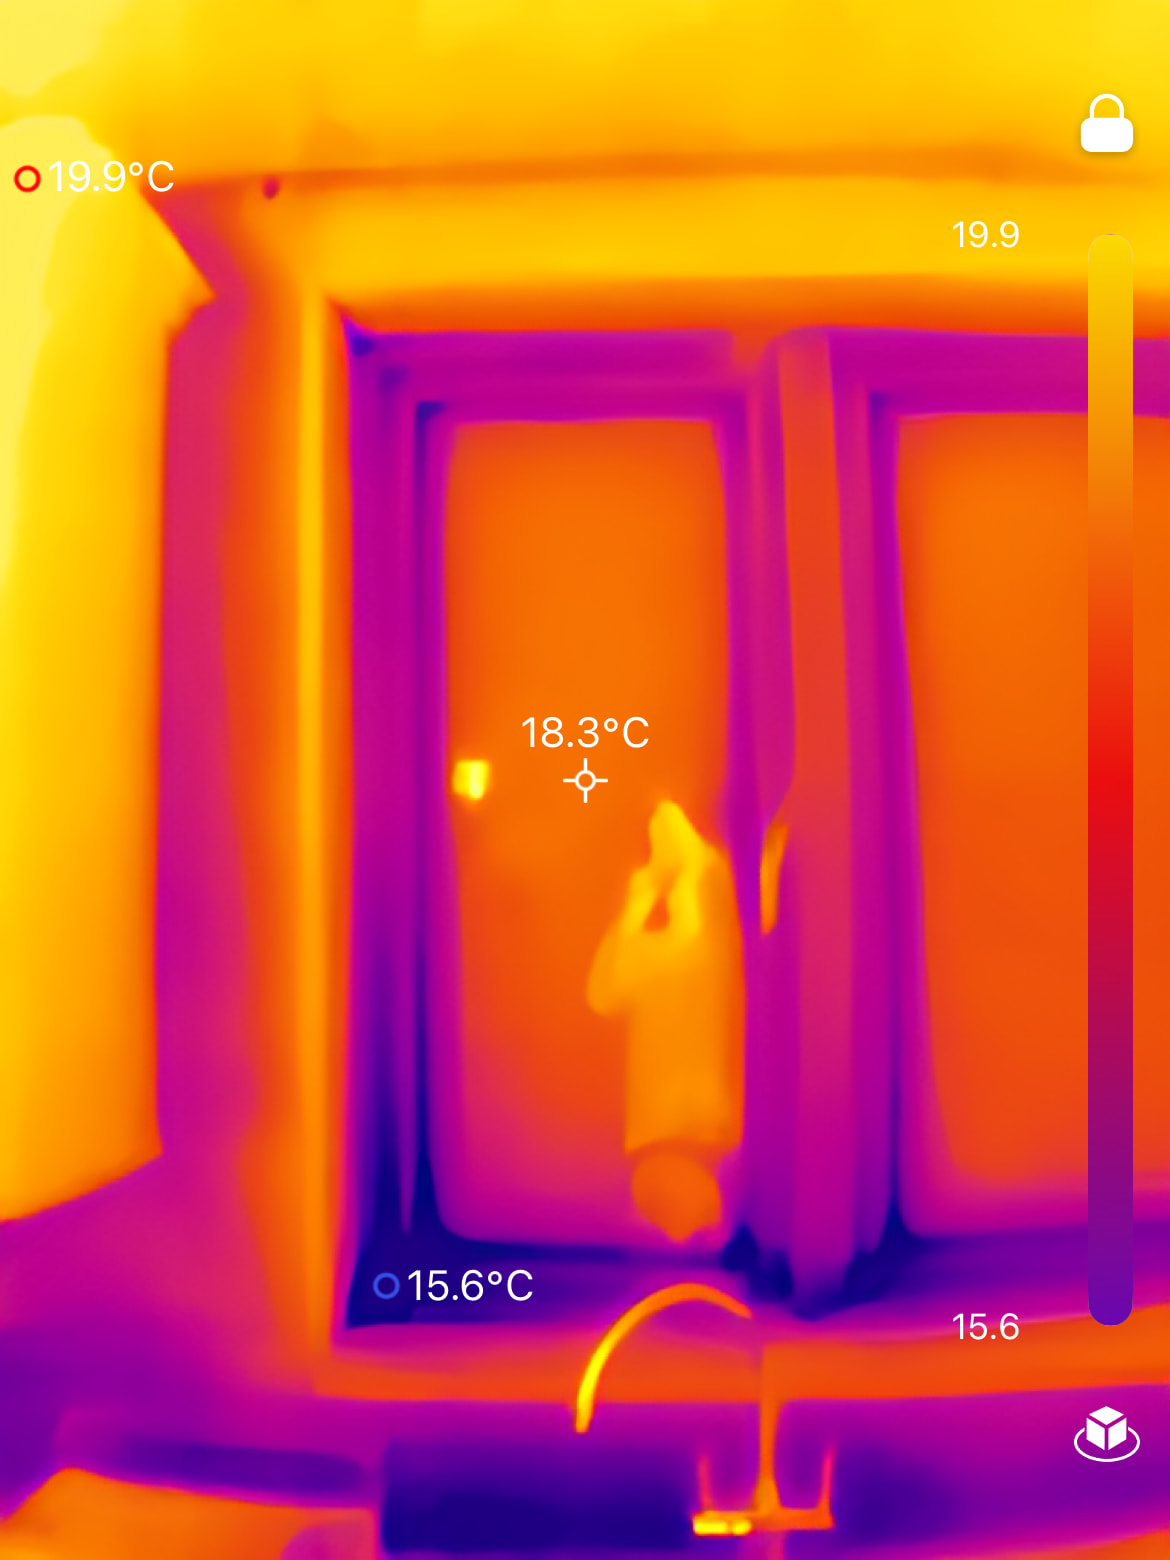
That’s me in the photos, so now you know how hot I am if not what I look like!
2 Likes
where do you see a hole in the insulation top right? From the inside or outside… I can’t see anything top, but everything’s seems blue on the bottom.

I am taking the cold area at the bottom to be due to the ill fitting casement. The windowboard is set into an insulation bed, including uprise similar to what you put around an insulated floor slab so I very much hope there is no thermal bridging there.
Below the window reveal and out of scope for this project is a tiled area with suspected air movement behind it, which I think has now become the coldest area near the window. I need to send my wife away for an extended holiday before tackling that!
1 Like